


siosios
DIY LED light bars
by , 05-18-2014 at 11:34 AM (167783 Views)
EDIT---if your interested in making something like this be sure to read though the thread before ordering/building. there has been discussion on different options and better ways. but even if you change the design you can still reference off the original pictures.
i decided to try and make my own light bar a few month ago so i started doing the research and sourcing parts. leds are becoming so common and easy to work with i figured i could pull it off for around 1/2 of the cost of buying one. don't get me wrong this wasn't just to save money because it was a lot of work to get this going, it was more of just the thrill of trying it and having some fun making them.
iv had a few people interested in what parts i was using and how i was putting them together so im doing a write-up on them.
I'm putting the warning out right now, these are obviously not as 'professional' by any means if you compare them to something you'd buy, the point was to save some money and have fun. i can?t guarantee these will even last because i have only been testing these for 3 months. so far i have had no issues, and dont expect any or else i wouldnt be sharing the info yet. (i have made some personal mistake though that i will state later) this does not involve a lot of brains but it is really tedious work. so you have to be really patient/steady/and somewhat mechanically inclined. i would hate for someone to attempt this that's over their head and waste their time and money.
the professional led light bars come with extras like being dim-able. Having their own professional built driver boards. etc. they are bling and im not saying they aren't worth the money. nor am i going to compare the quality of something that's handmade to something that's factory made....and im no electrical engineer so im sure there are far better ways to go about this. maybe some of you smarter people can take what i have done, add stuff or change stuff and make your own different setup. the fun part is you could run different leds, put in different lenses, mount them differently or use a different drivers than i did. im hoping this will broaden some thought and maybe become better in the future, just trying to give people the idea that the technology's there to build your own custom led lighting. my issue was i wanted some bad ass leds but didn't want to spend 1500$ on them.
but with all that said... i will guarantee that these will put out the same if not more light than anything else out there on the market. These led?s are incredibly bright!!. they pretty much melt asphalt at 500ft and still shine over 1000ft. the only thing that's cheap with these are the drivers. the leds and lenses are as good as it gets. the drivers are cheap hong kong brand. but iv done a lot of research and tested mine and am confident that their still quality... considering that pretty much all led lighting/accessories aren't made in the US anyways.
The biggest downside of this project is waiting on the led drivers to come in the mail. Takes one month, but it?s worth it. They have an upgraded driver that they have changed so i would order the drivers from the place iv listed. if you don't get them from deal extreme you might get the older version of the driver which is still good but just a little different design so it won?t match up to my step by step process (yes I have had the older style). its up to you.. but im just giving a heads up. trust me i hate ordering stuff from deal extreme but so far its all worked out from them. Plus its free shipping and no tax so its all cheap.
the drivers are rated from 6.5v-18v power input, this makes them easy to run on a lot of different setups. THROUGH TESTING THESE I HAVE FOUND OUT THAT THE DRIVERS DONT LIKE TO GO BELOW 7 VOLT. (IF YOUR BATTERY IS DYING) WHEN THE INPUT VOLTAGE GETS BELOW THAT YOUR LEDS WILL START TO FLICKER AND DO WEIRD THINGS, BUT AS SOON AS YOU GET THE VOLTAGE BACK UP THEY IMMEDIATELY GO BACK TO NORMAL. since i have only ran these with 12v automotive setups i cant give any info on whether they still work well on the higher voltage range. but i have read numerous post of people hooking them to 36v setups and them still working fine. i wouldn't do it though without testing it first for a few months.
im using CREE XM-L Neutral White LEDS, they run at a color spectrum of just under 5000k, this is almost a perfect match to what daylight looks like. They do make a darker 7000k version of the led (for the crowd that loves the blue-ish look) but i wouldn't suggest it. (i have tried them). The neutral white is the clearest looking light and won?t strain your eyes. These led?s are rated at 1000 lumens per led. but these drivers under power them for safety reasons. so from what i know on the specs im just guesstimating them putting out somewhere around 875 lumens. and im talking about final lumens being projected. not what their rated at (a lot of places will hype them being 1000 lumens of output but that?s not realistic) the cree xm-l is one of the best high powered leds on the market. it has from what i know one of the highest % efficiency rating... meaning the % of power being used to the light being put out is the one of the highest out there.
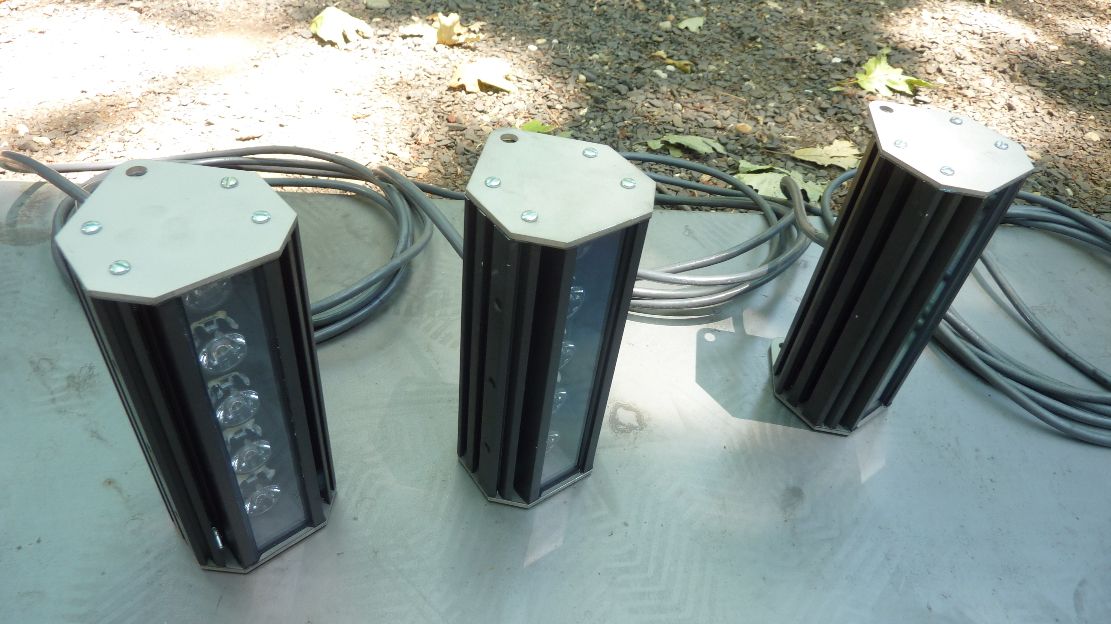
i don't want to go to much into detail about the numbers as far as power ratings of the drivers and leds. people can figure that stuff out once they read the specs and info on what i have used. i havent legitimately tested these for their power draw but off of all the manufactures specs, each bar should be around 65watts (they would be more efficient with better drivers and running them in series). from what i have seen one bar put out about 3 times as much light as both high beams on my car. and my car lights are actually pretty good. each bar should be somewhere around 4500 lumens. i built 3 of these because once your setup for ordering parts and making them you might as well make at least 2. they come out to right around 180$ per bar. but it does get cheaper if you make more than just one. i think since i made 3 it ended up being more like 160$ each.
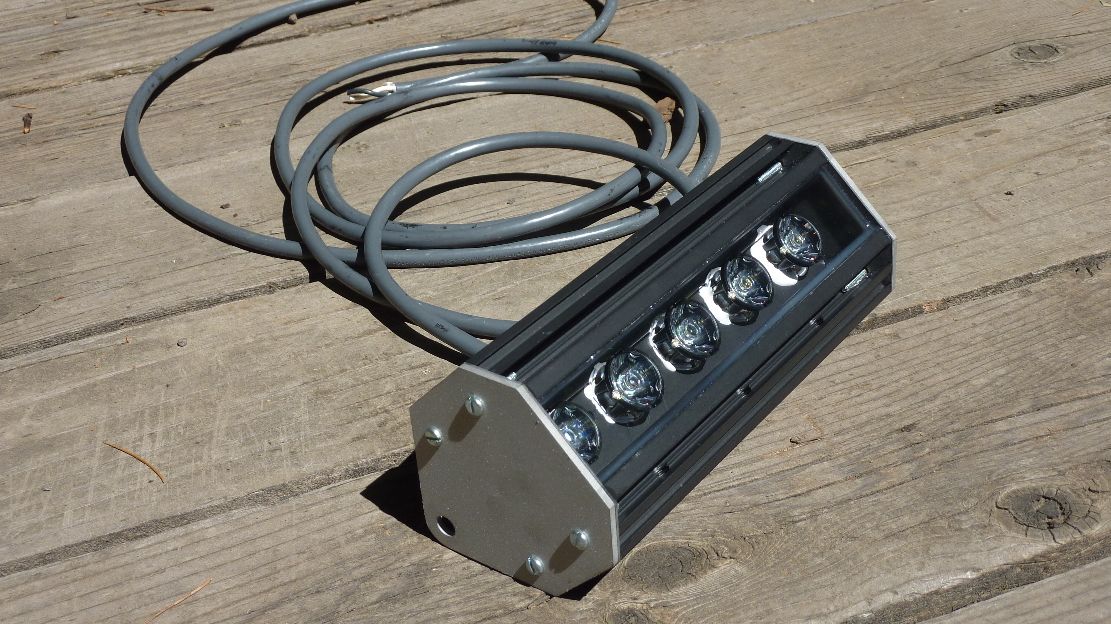
the light bars are kinda deceiving in the pics for looking bigger than they really are. they are actually really small. Between the size of a 12oz and 16oz beer can. ill post the pdf file on them for specs.
the drivers are pretty much specific for this led and a few others. this is such a high powered led. (3.6v at 3amps max) that there are only a few small cheap drivers that are on the market for them. the one i used was the best one for the application/cost. it has a high/low/strobe. you switch through the modes with powering it on/off. After about 12hours the drivers memory will clear and next time you turn them on it will automatically start back to high mode.. no matter what previous setting you had it on. the stobe is really annoying i would never use it. it literally would induce a seizure. (if your really good with electronics, i have read there is a way to disable the strobe mode on the micro board)
i am using carclo lenses for these leds. they make a lens housing that gets glued to the led. (yes its led specific) the beauty of it though is once the lens housings glued in place you snap the lenses in after its all dried. so you dont have to worry about messy glue getting all over your optics. Also they make probably about 6 different types of lenses that snap into the same housing for that led. i bought and have tested every type. I fell in love with the spot lens and used them in all 3 bars. its a 17* optical lens. it project light perfectly. Shoots it way out there but still has a good amount of spill light out the sides so you still have a wide field of view. cool thing is you could even run different lenses in the same light bar housing if you wanted. Quick warning though if for some reason you decide to take out a lens after its snapped into the holder be very careful. i have broken a lens holder before pulling a test lens back out. had to rip off the lens housing and re-glue another one back on. Wasn?t a big deal but just giving a heads up. kind of one of those they are meant to be installed easier than taking them out type things.
the extruded aluminum housing comes from china but is formed to a standard size. i was able to find the 1-1/4 x 1/8 aluminum flat bar for the back at any osh/lowes/ace hardware stores. i used 1/8" thick lexan for the front windows. you can either buy it and cut it. or just go to a glass store and they will cut it for you. i think i paid 10$ for 3 of them cut to the right dimension. i would only use Lexan, NOT Plexy. pretty much any hardware store should carry the aluminum strip, grommet for sealing the power in cord, end cap screws, and possibly lexan. none of this stuff was difficult to source locally. Unless you live in B.F.E.
if you decide to make a light bar just be patient, this kind of stuff takes a while not because its tons of work, but more of you have to glue..let dry.. glue.. let try. dont get to ahead of yourself with gluing everything. it will get way to messy and a lot of times you have to hold the glued parts for at least 5 minutes, making the first ones always the hardest. at first it was a pain. but by the second one i had it down and it was a breeze. this kind of project is very temperamental though. if anything?s going to go wrong and not work right or blow up.. i can guarantee its most likely gonna be from builder error, either wiring is wrong, wires aren't soldered good enough, or you soldered them to hot and melted something else on the board, of didn't seal the housing right and water got in the first time it rained type thing. and trust me with high powered leds, everything can go poof in just a split second if you fuck something up. i have blown through numerous drivers and leds when i was in the testing stages. Note to everyone thinking about building one BUY MORE LEDS/DRIVERS/glue THAN YOU NEED JUST ENCASE. its a bummer when you only order what you need and realize you accidental destroyed a driver.. and have to wait another month to get one.
you Need to use a thermal epoxy (not regular epoxy) for attaching the leds/lens housings to the extruded aluminum, for the drivers getting insulated, and also for the drivers being attached to the back aluminum strip. i found that buying 2 packs of the glue i listed works out to just the right amount for one bar. but that's from me already working with these, so i wouldn't hesitate to just buy an extra.
Also these high powered leds need a lot of heat sink, I have maxed out this housing with using 5 leds. The housing will get up to 180 degrees when its 80 degrees out, but that is being stagnant. I kinda figured night wheeling shouldn?t be any hotter than around 80, plus it will get a lot of air flow when its on a truck moving. That might sound hot to some people, but don?t worry about it. Metal just sitting in the sun on a hot summer day can get up to that temperature easily. I have been testing in a high heat scenario for a while now and everything a-ok. Just wanted to warn people before they freak out saying its hot to the touch. There is is a chance that im pushing the heat on these very slightly but usually if you push the heat that only means you?ll get 20,000 hours instead of 30,000 hours out of the life of the leds. And in this application anyone would be lucky to ever use these more than 1000 hours. So im not worried about it.
And finally these are seriously extremely bright, if you decide to make some and run them please dont be a dip shit. i have mine so i can run them in the desert/snow wheelin. this is not something you'd want to run on a populated trail or around a big group. i would be really pissed if someone was miss using them. it?s kind of like looking into the center of the sun so be smart about when to use them
ENJOY!
PARTS LIST
Thermal Epoxy - Amazon.com: Arctic Alumina Thermal Adhesive (Two Tube Set): Computers & Accessories
LED Optical Lenses (I used the ?plain tight lens?. Lens holder goes with all lenses) - Cree XPG - LED Optics
LED Drivers http://dx.com/p/t6-2500-3000ma-3-mod...3&u=128269 (EDIT---THIS WOULD BE THE ULTIMATE DRIVER FOR THESE LEDS, I WISH I USED THIS. ITS FOR AUTOMOTIVE USE, COMPLETELY ADJUSTABLE, DIMMABLE, ETC. HAS ALL THE BELLS AND WHISTLES. COULD RUN 3 LEDS IN SERIES PER ONE OF THESE DRIVERS Hyperbuck Driver Technical information)
LED - http://www.ledgroupbuy.com/cree-xm-l...=0CGYQgwgwBTgK
LED Bar with pdf (update- i also just included the template for mounting the leds. just print it out on a 1to1 scale, cut it out and then center punch/trace what ever you need. the large led circles that are .875 are oversized to what the leds actually are. i think the leds are exactly .825 diameter. i had them over sized because i was gonna use the same template for the drivers, but didnt need to afterall.. the drivers are slightly bigger. this will still work fine but just giving a heads up that it wasn't designed for a perfect match on led diameter, i might redo this to a prefect match later... heres the template https://acrobat.com/#d=KbQGV*ZQ14opYnhGip5rog) - http://theledguy.chainreactionweb.co...roducts_id=997 http://www.dmcleish.com/CreeBar/Cree...dimensions.pdf
LED 12g Stainless end cap?i will send anyone the solid works file or laser cutting file if you PM me. I do have about 55 more end caps that I will ship for 10$ a pair since I had to get a bunch cut. Once they are gone Im most likely not gonna get more cut unless there?s a huge demand for them. Also I am not getting a yellow star just to sell a few end caps that I already paid for, I am not making money on these nor am I marketing something. This is strictly to help people out that are interested in the DIY. This is not a money making project so please for the people that love to overly bitch about needing a yellow star, lets be reasonable, if it becomes a problem I just wont offer it anymore. If you are gonna build some and don?t want to get your own cut or hand cut them just pm me. heres the solid works scale 1 to 1 pdf file. https://acrobat.com/#d=m*9wBAG1MdPmFfKYKFQNXA
Grommet ? just get one that matches your cord. Mine matches the 18g 2 wire I got and was meant for a 5/8?s hole 1/8? deep. So it worked out well. Got it at ace hardware.
End Cap Screws ? they need to be sheet metal self threading screws (not self tappers). I used ones that were 3/4" long. Going blank on the size and thread pitch right now? ill update that once I find out. I also got those at ace hardware.
Gasket between end cap and housing ? use some sort of gasket that's mainly made of rubber. if its more of a paper gasket it can leak condensation into the bar.
Epoxy for holding wires in place ? just any 5 minute epoxy will work, I used clear.
Housing sealer ? the final sealant I used for sealing the front glass, back piece, and sides is called Flowable Silicone. You can get it at autozone probably elsewhere to. Only use that stuff. The brand I used was versa chem. don?t used regular silicone. This stuff is ultra clear, really tough, sticks extremely well, self smoothing, and flowable just enough to work into spots but not be too runny. Its specifically for window sealing and works night and day different than regular clear silicone, its awesome stuff. if you use it right, it will look like a factory sealed job when your done.
Silica packets for moisture control - go to the shoe store and ask for a few small ones, use one per bar. they should be more than happy to give them to you for free.
pics
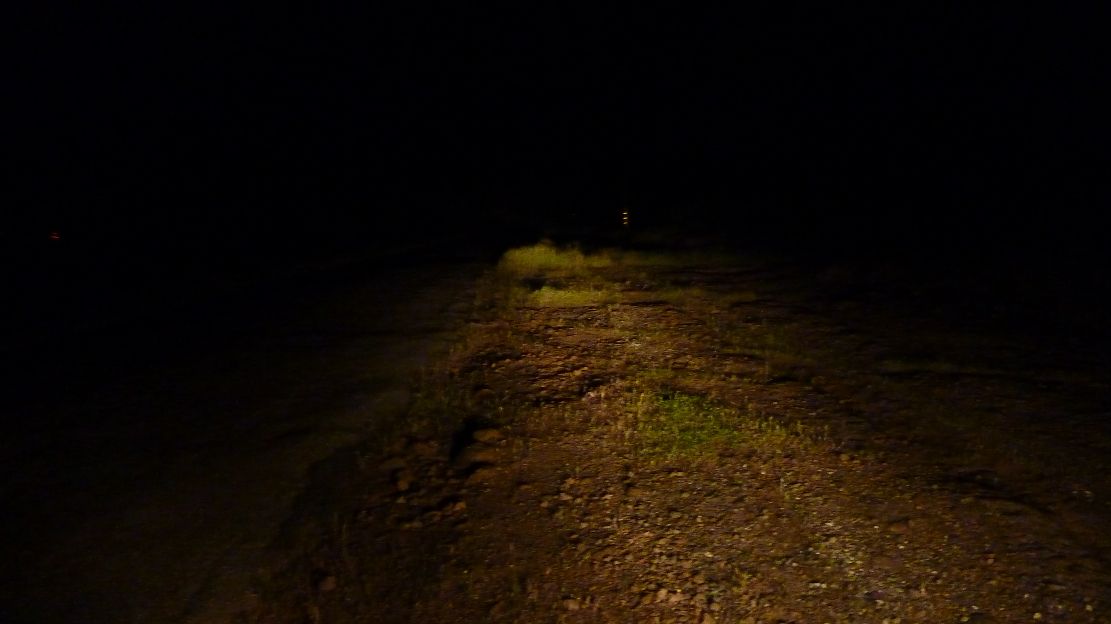
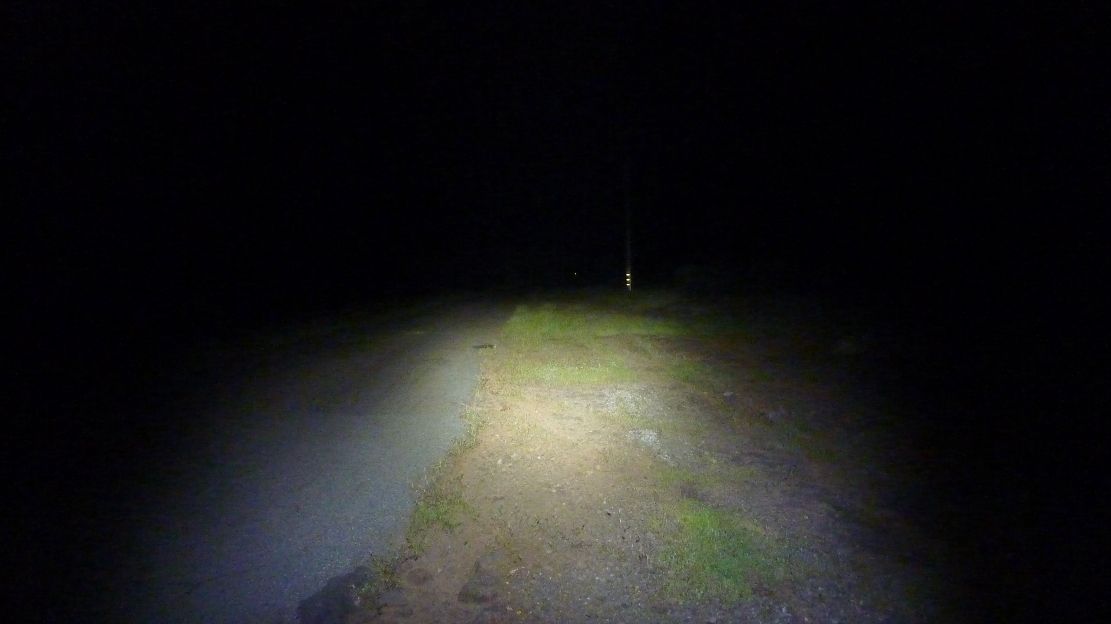
camera doesn't quite pick up the light since it auto focuses on the hot spots. in reality these should both be slightly brighter and show more light off in the distance but its a good comparison using the same camera settings. this is just one of the led light bars comparing to the high beams on my car.
car high beams
one led light bar
here is also a video of all 3 of them running on a temporary mount so i could hold them together.
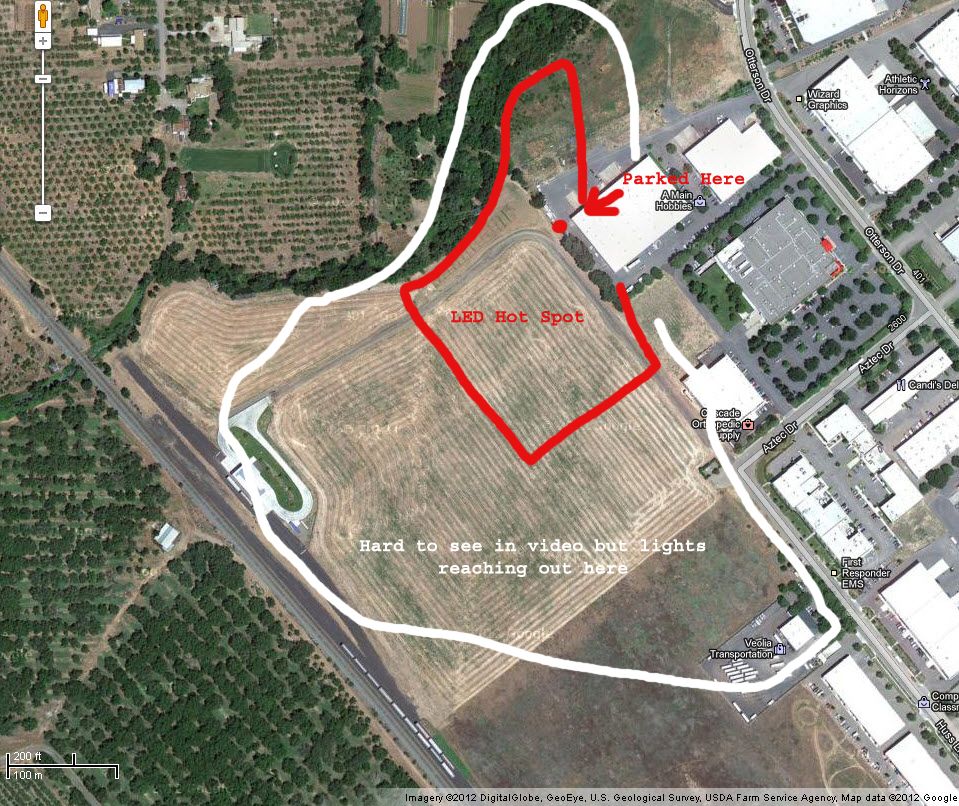
here's the map to back up the video
Possible Changes After i already made my bars and started this thread
IT WOULD BE BETTER TO WIRE THESE DRIVERS IN SERIES, YOU COULD WIRE 3 LEDS TO ONE DRIVER AND THE OTHER 2 LEDS TO ONE MORE DRIVER. THAT WAY YOU WOULD ONLY NEED 2 DRIVERS PER BAR AND IT WOULD RUN MORE EFFICIENT. I MESSED UP WITH MINE BECAUSE I DIDN'T FULLY UNDERSTAND HOW THESE DRIVERS WOULD WORK IN SERIES. BUT NOW I DO
ALSO HERE IS ANOTHER DRIVER OPTION, THIS IS MORE EXPENSIVE BUT WAY BETTER MADE AND MORE RELIABLE THAN THE CHEAP CHINESE ONES. IF I WERE TO REDO MINE I WOULD HAVE GONE WITH THIS DRIVER.
ANOTHER OPTION, WHICH WAS MY ORIGINAL IDEA BEFORE I WENT WITH THIS WAY WAS TO PUT THE DRIVERS IN A SEPARATE SEALED BOX THAT WOULD EITHER BE UNDER THE HOOD OR IN THE CAB. THIS WAY YOUR LIGHT BAR WOULD ONLY HAVE LEDS IN IT (WHICH WOULD RUN WAY COOLER). ALSO IF YOU WERE TO HAVE A DRIVER GO BAD IT WOULD ONLY BE A 5 MINUTE REPAIR TO REPLACE THE BAD DRIVER. (IF THE DRIVERS ARE IN THE EXTRUDED HOUSING LIKE MINE, IT WOULD BE HOURS TO REPAIR A DRIVER AND RESEAL THE HOUSING), IN THE FUTURE DEPENDING ON HOW WELL MINE LAST.. IF I HAVE PROBLEMS WITH SHITY DRIVERS IM GONNA TEAR MINE OUT, GO WITH A DIFFERENT DRIVER AND GO TO AN EXTERNAL DRIVER HOUSING AS MENTIONED.
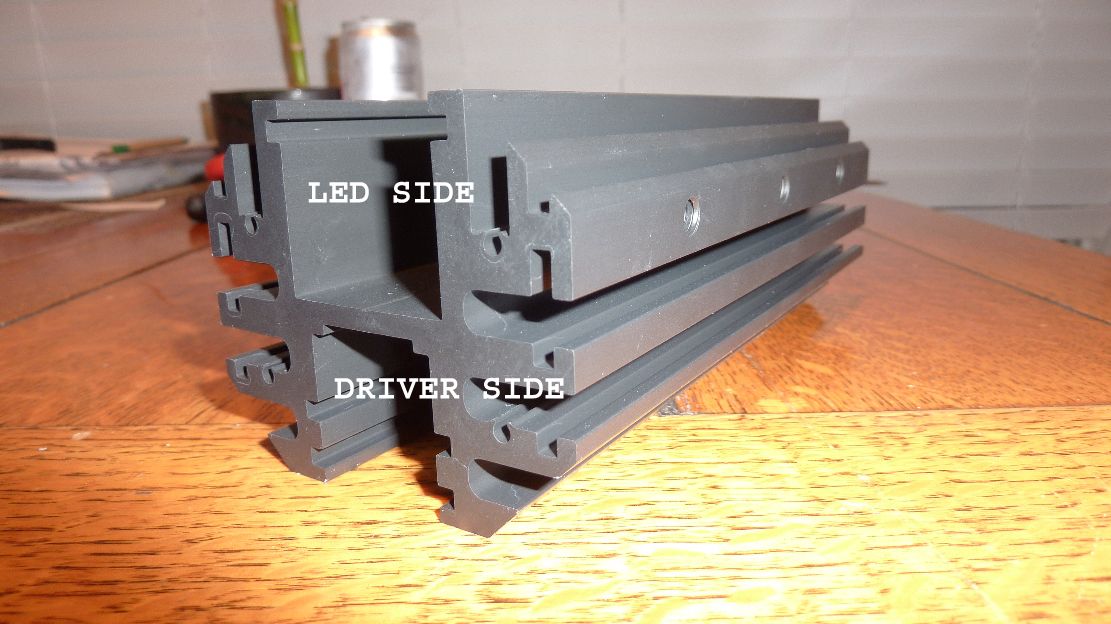
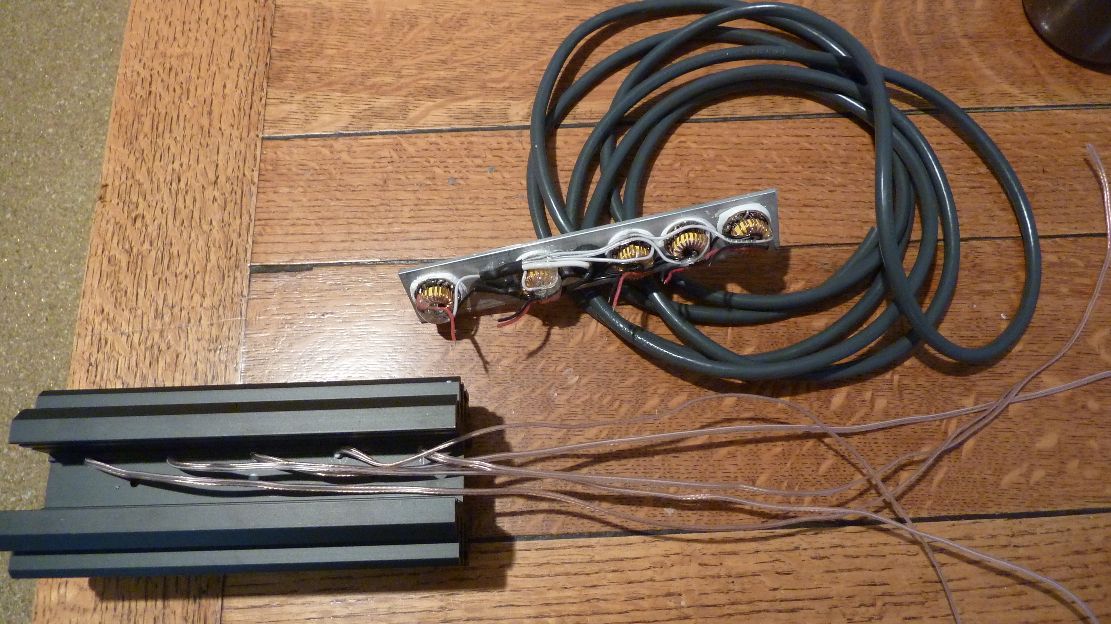
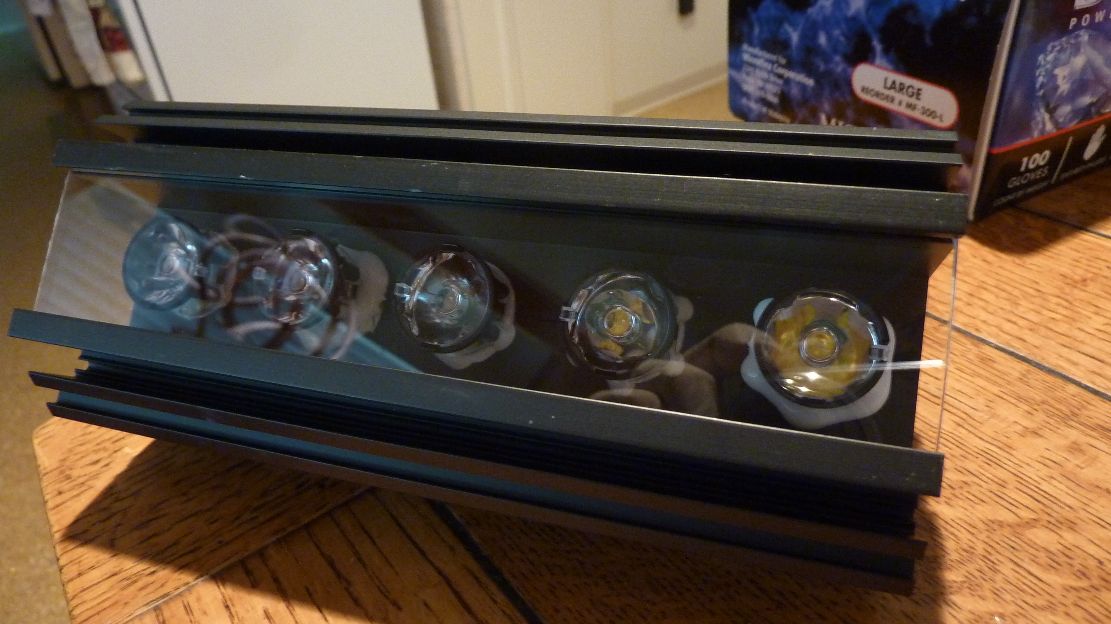
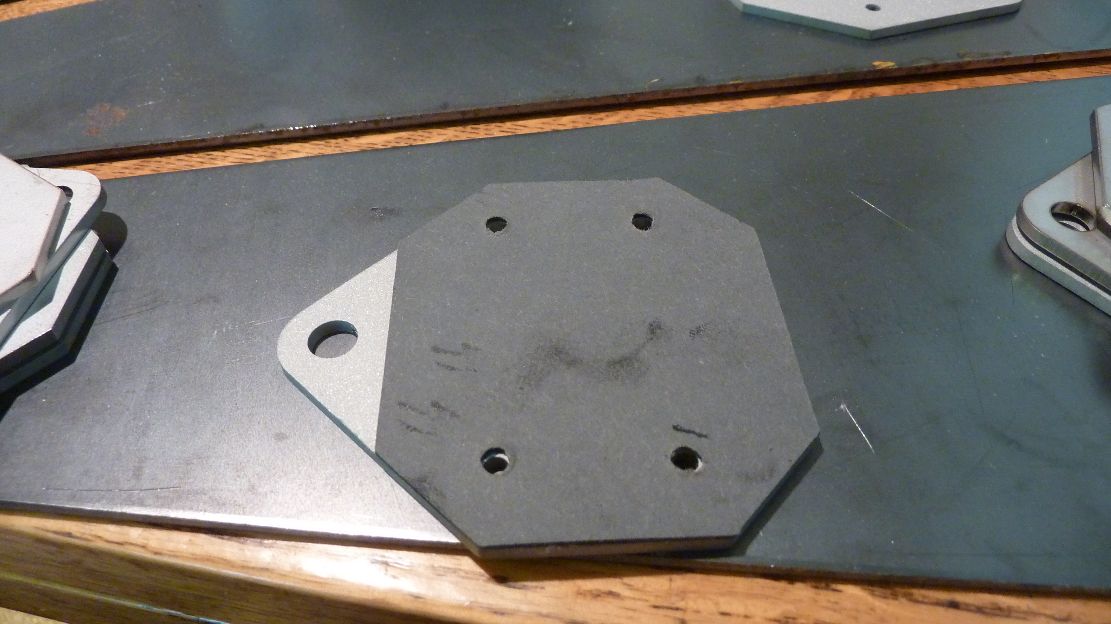
heres the extruded bar (for dimensions look in parts list)
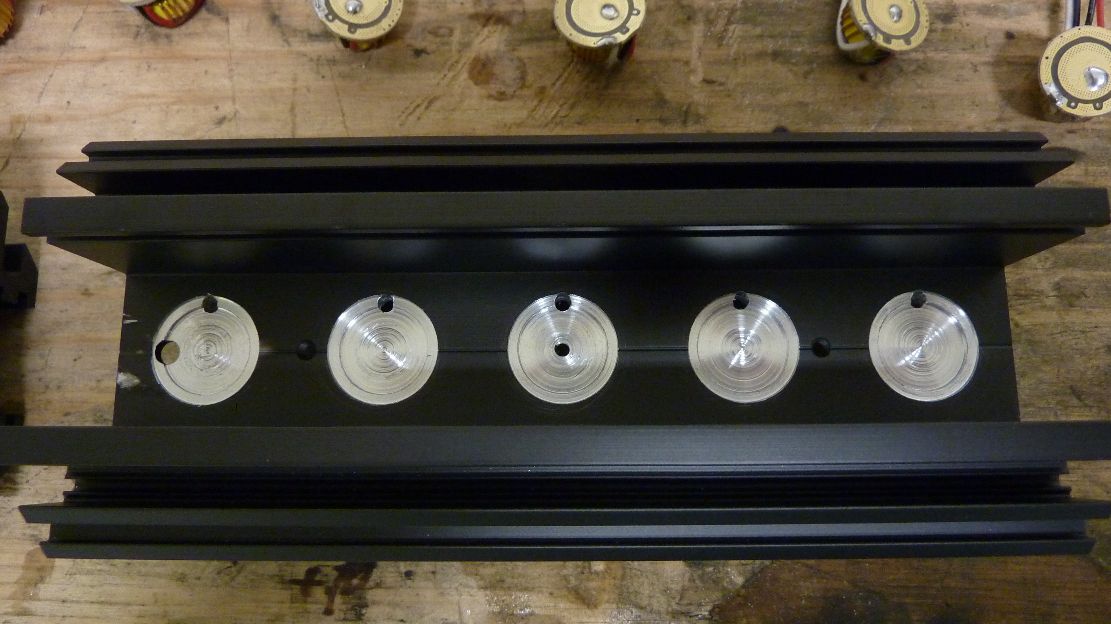
i have access to a mill so i actually milled the bars a bit so once i glued the leds i could just push them in and they would self center. i will post a solid works image that can be printed out on a 1 to 1 scale.. cut out.. and layed on the bar for a tracing/center punching template. the milling is not necessary you could just score the diameter of each led circle for a reference line for when you glue. the little holes on top for the power wire to go through could just be hand drilled. i will get that solid works image up soon. dont mind some of the other holes that already come pre drilled. anything you still see in black anodizing isnt being used.
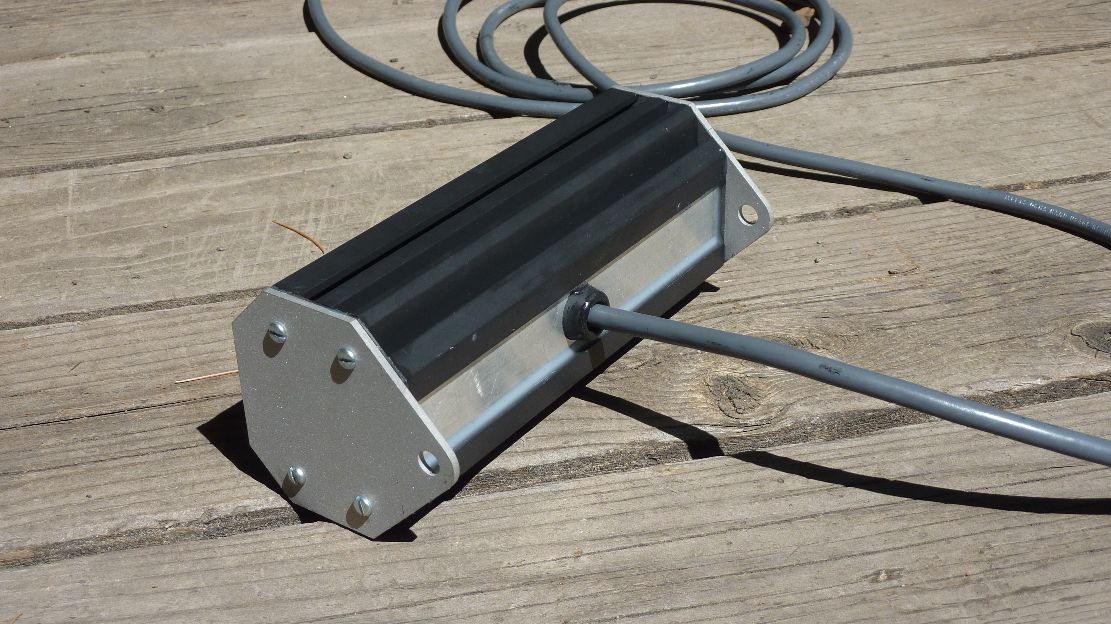
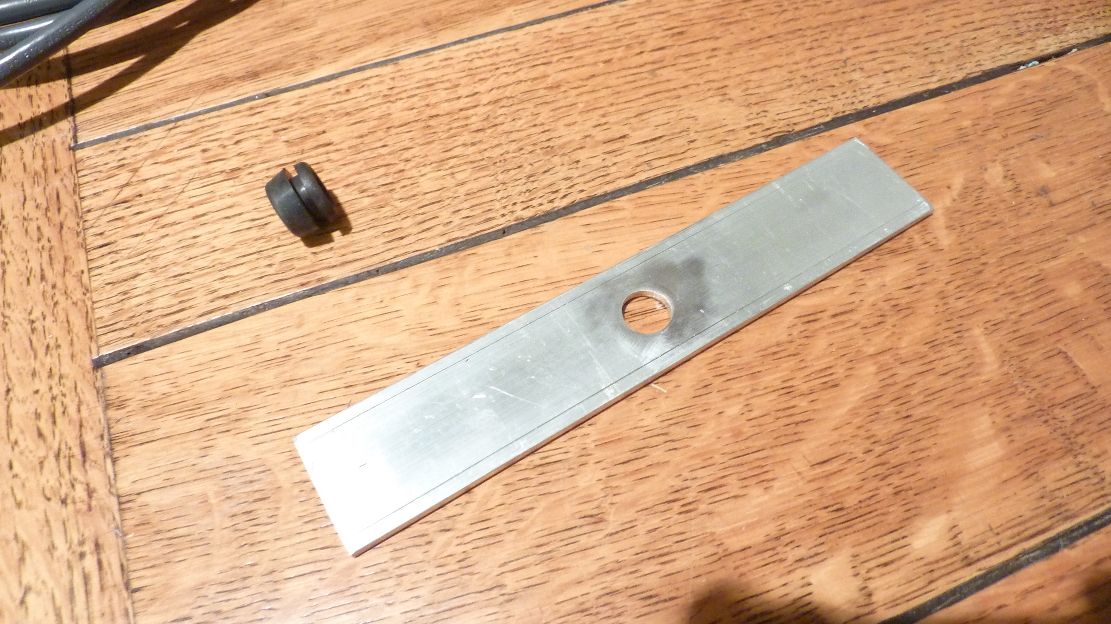
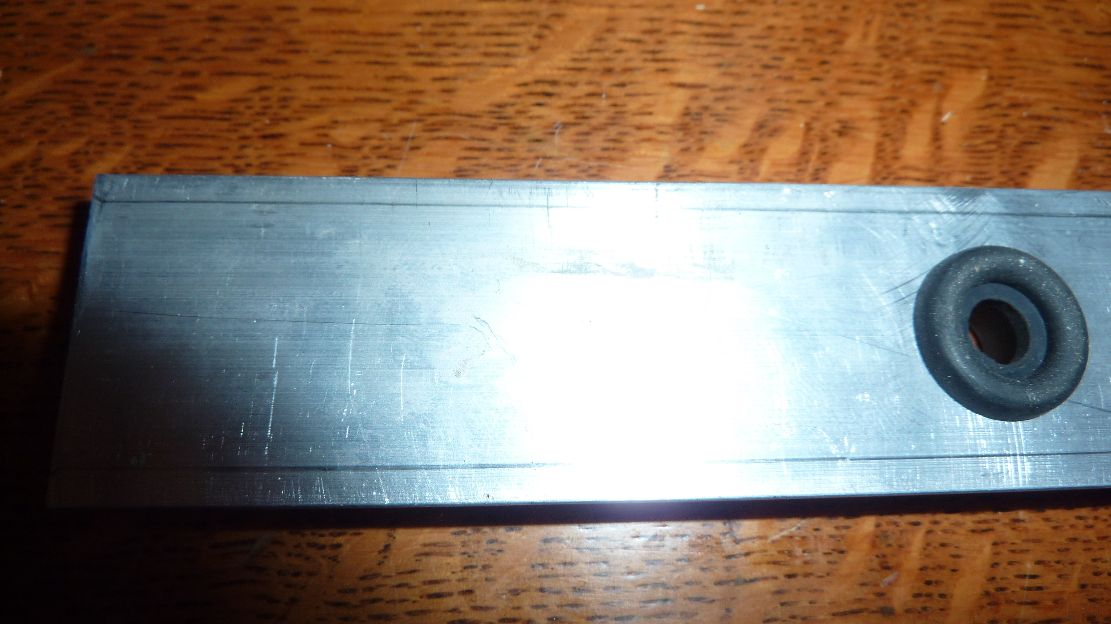
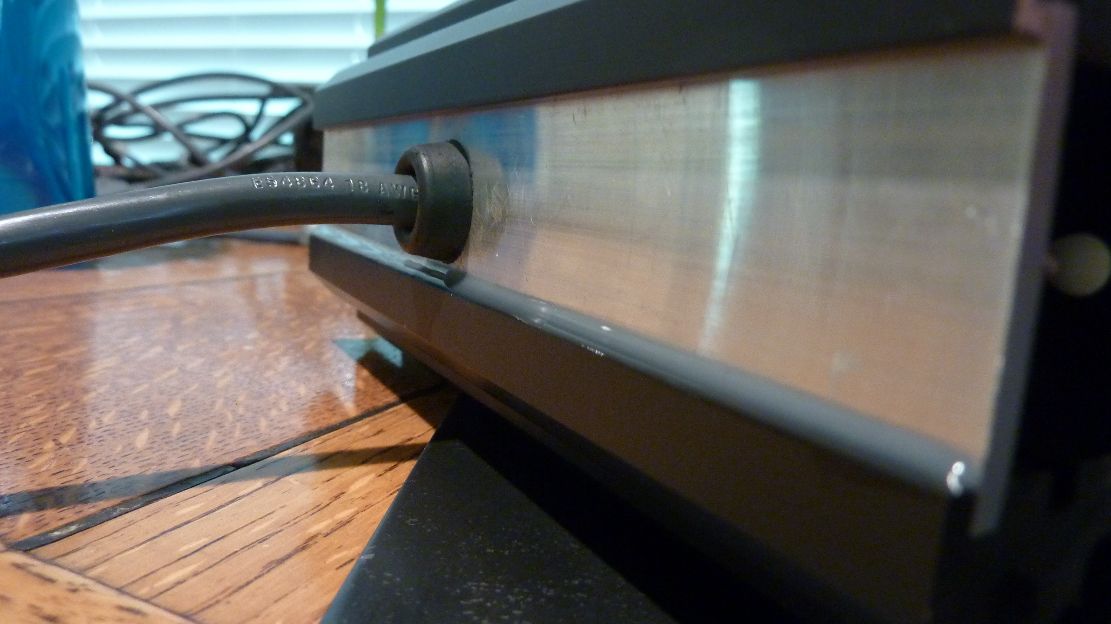
heres the grommet i got with the aluminum back piece 1-1/4" by 1/8" thick, cut exactly 7" long. grommet hole was 5/8's and centered.
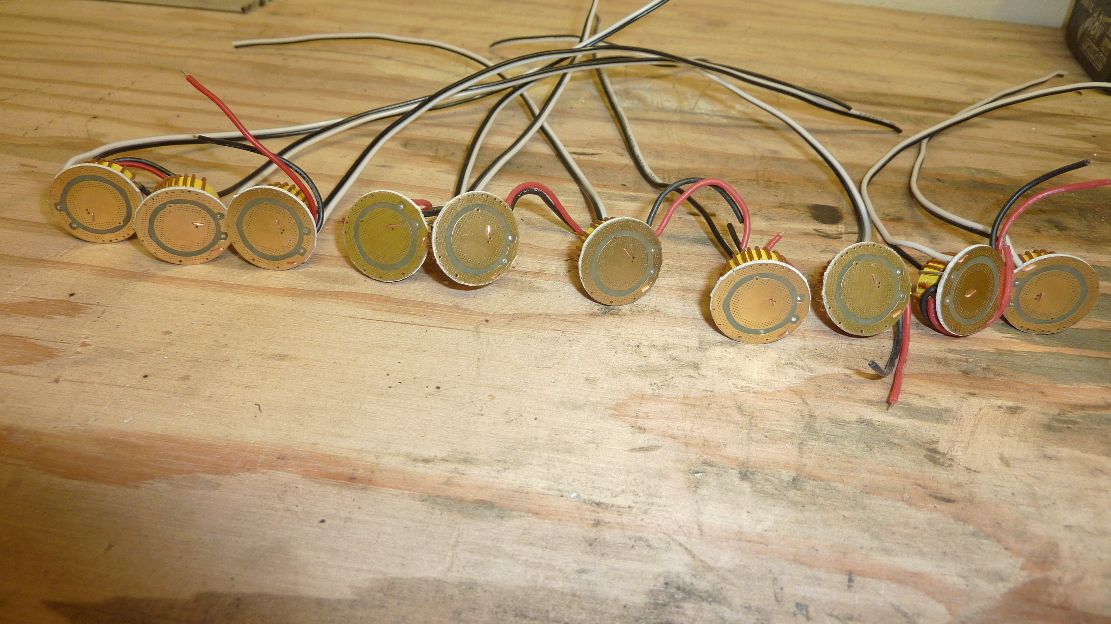
I cut 5 pairs of these wires per bar at about 14" you'll be cutting them down later. when you strip the wire you only need to expose 3/16"
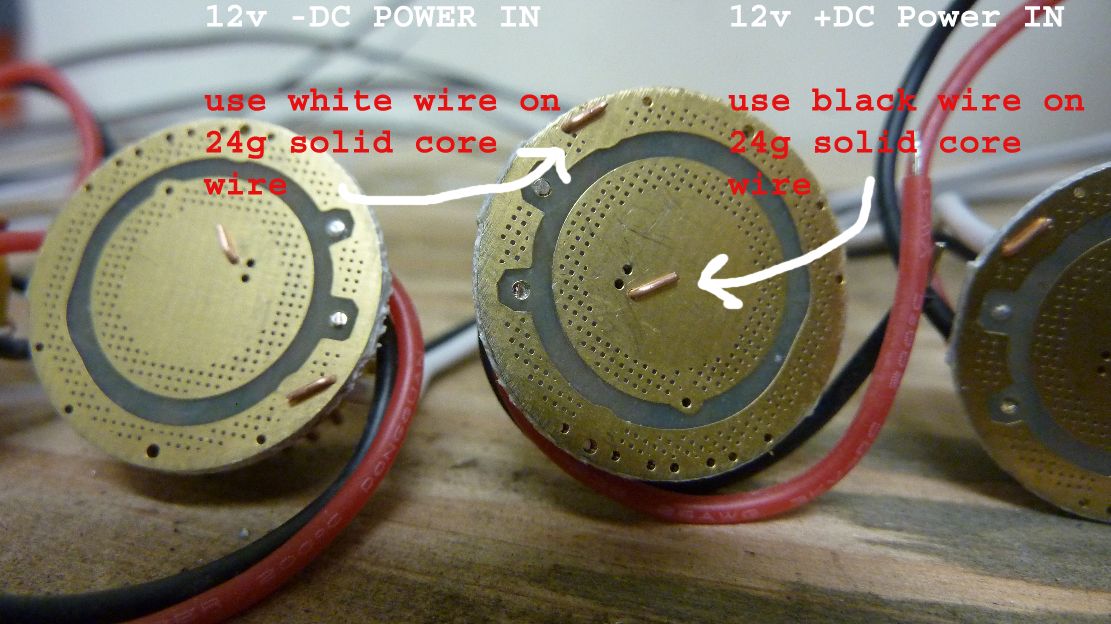
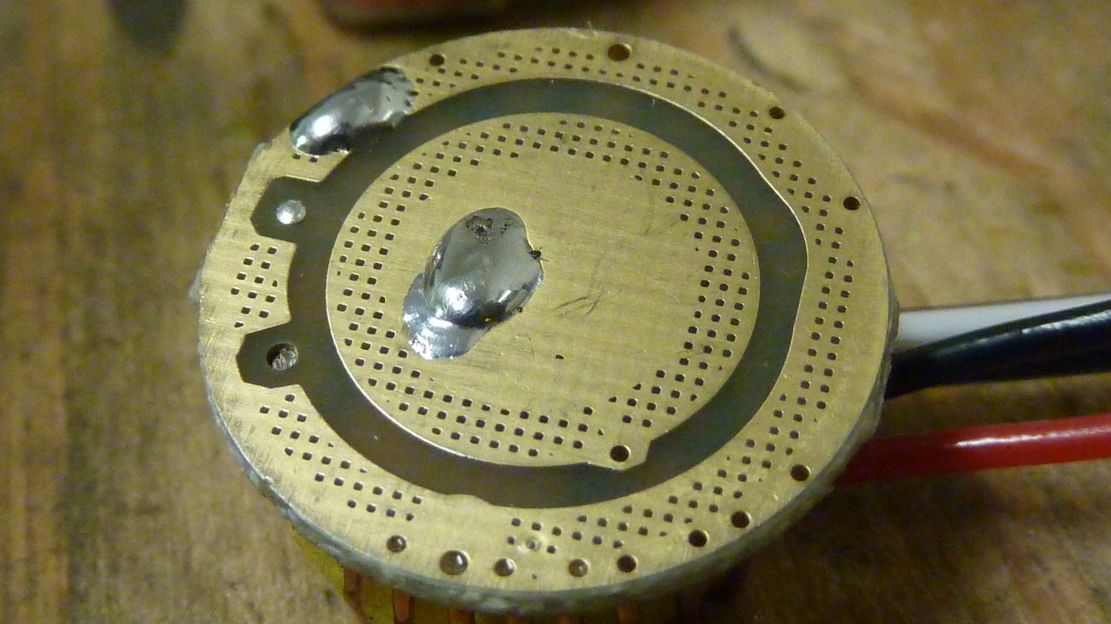
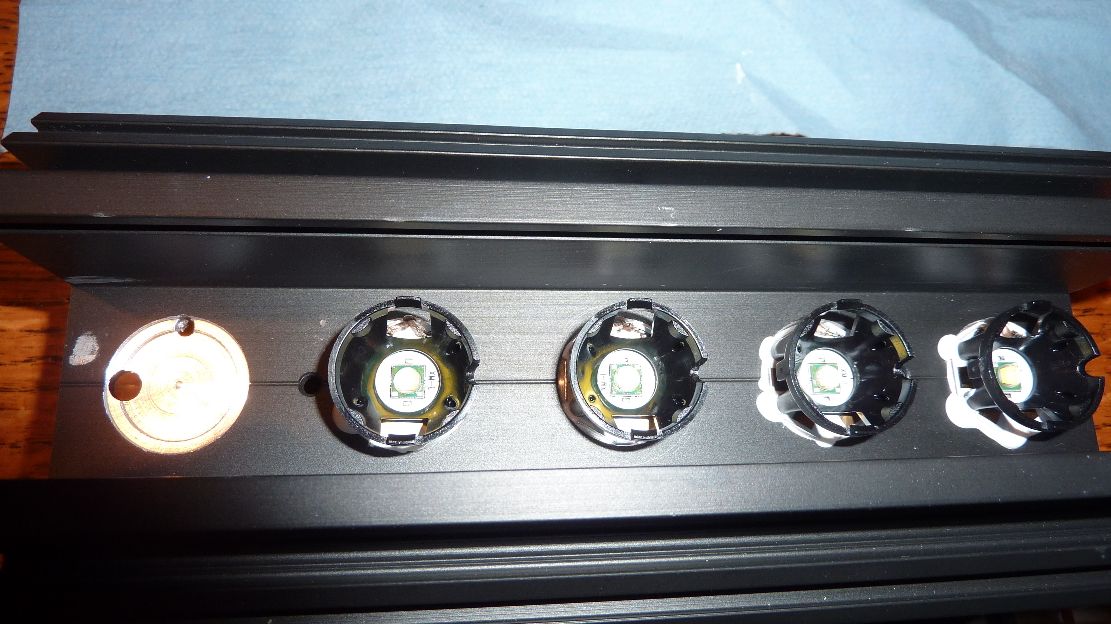
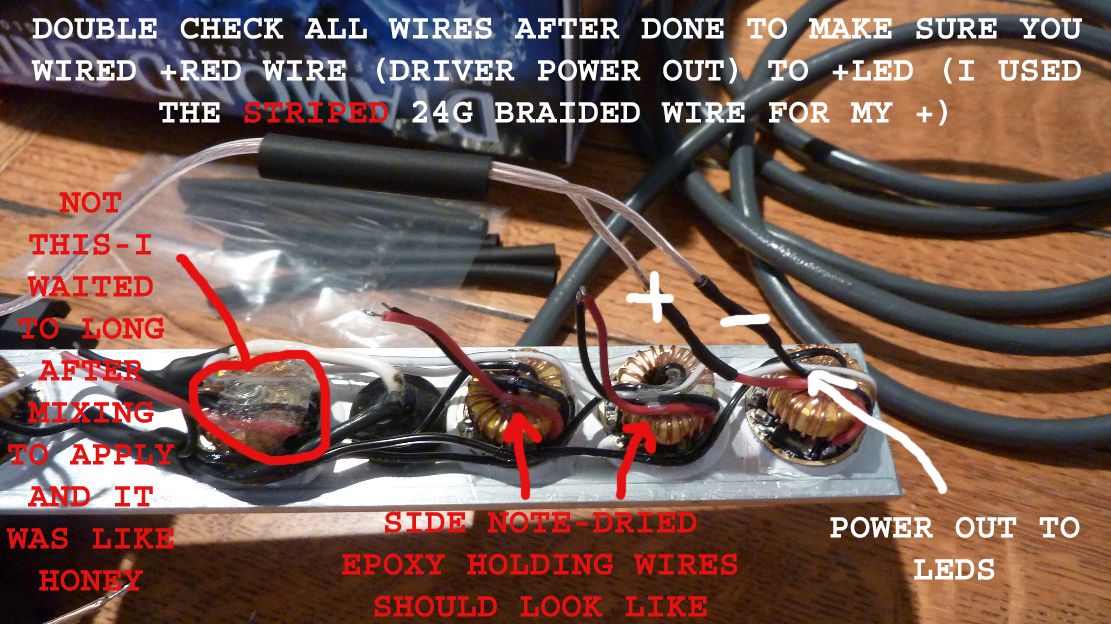
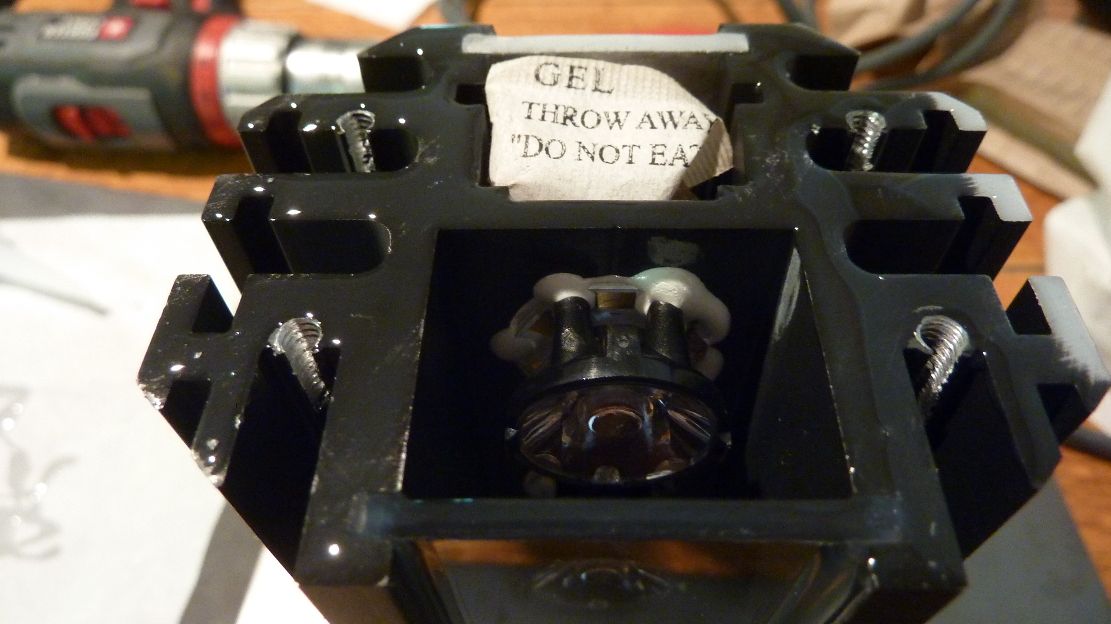
from the pic, find the holes i have used. and push the stripped wire though from the top side. make sure you bottom out the wire where you have stripped it before bending the exposed wire over on the bottom side of the driver so that its more rigid.. solid core wire breaks easily so be careful. solid cores the only thing that fits though the holes well. if you had a small drill bit you could open them up a bit more and use braided wire.. it would be better, but not necessary. in the pic, on the bottom side of the driver, the center circle of the board is all 12v+ power in. the whole outside of the circle is 12v-. you could push the wire through any of the holes as long as you are using the right polarity.. the reason i have chosen these specific holes is i have found it puts the wires in a better location down the road.
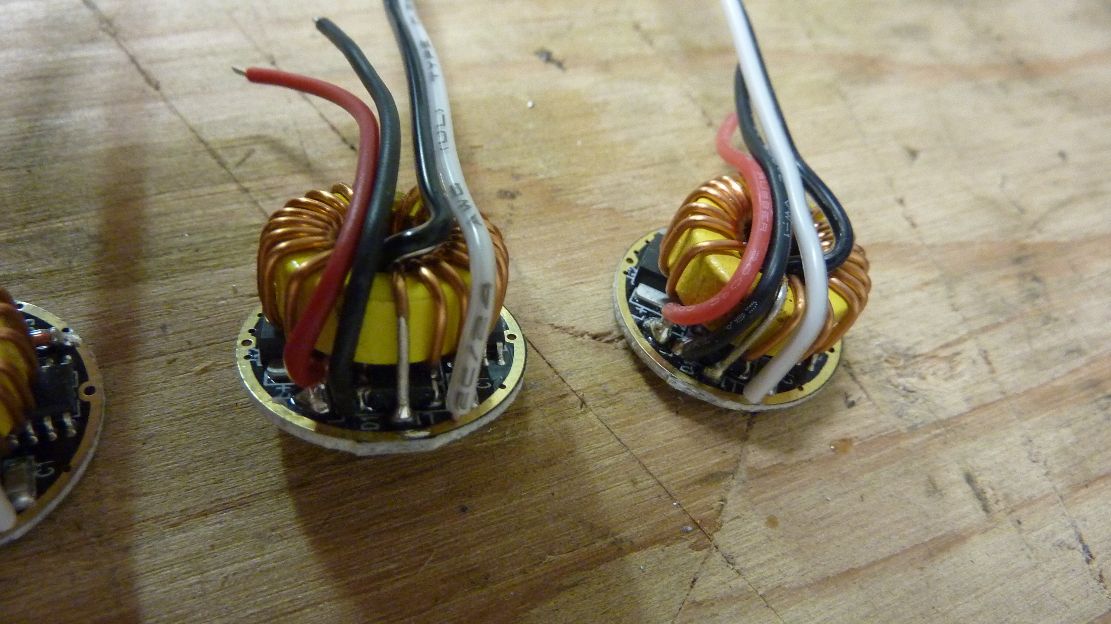
once there all through/bottomed out/ and bent over. solder them. be sure you use a decent solder. makes a mess if you use cheap shit. also obviously try and do it quick, so you dont melt anything else on the board. MAKE SURE THERE IS NO POINTY LEFT OVER SOLDER SPOTS AFTER YOUR DONE, IF SO, EITHER TOUCH THEM UP OR HIT THEM WITH A FILE, if theres sharp solder spikes they will poke through your insulating glue... if that happens your housing will be charged with 12v, and you don't want that. ASK ME HOW I KNOW...these drivers are about the diameter of a penny for reference
after solderings all done CAREFULLY bend ALL the wires on the board all to one direction so there clean and neat. space is tight so the cleaner everything is the better it fits.
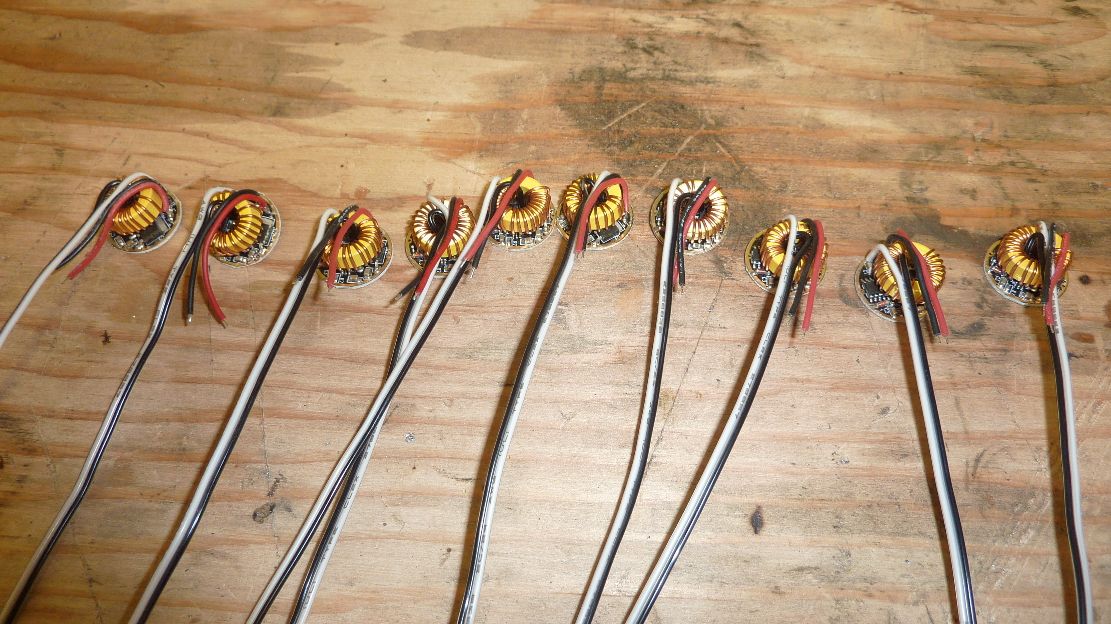
use something to hold all the wires/drivers to where everythings neat and snug. then use the standard 5 minute epoxy to glue the pack of wires to the top of the drivers. this is only to hold everything in place. its also hold everything so when you slide the back piece in the extruded housing none of the wires can rip or break off the driver board.
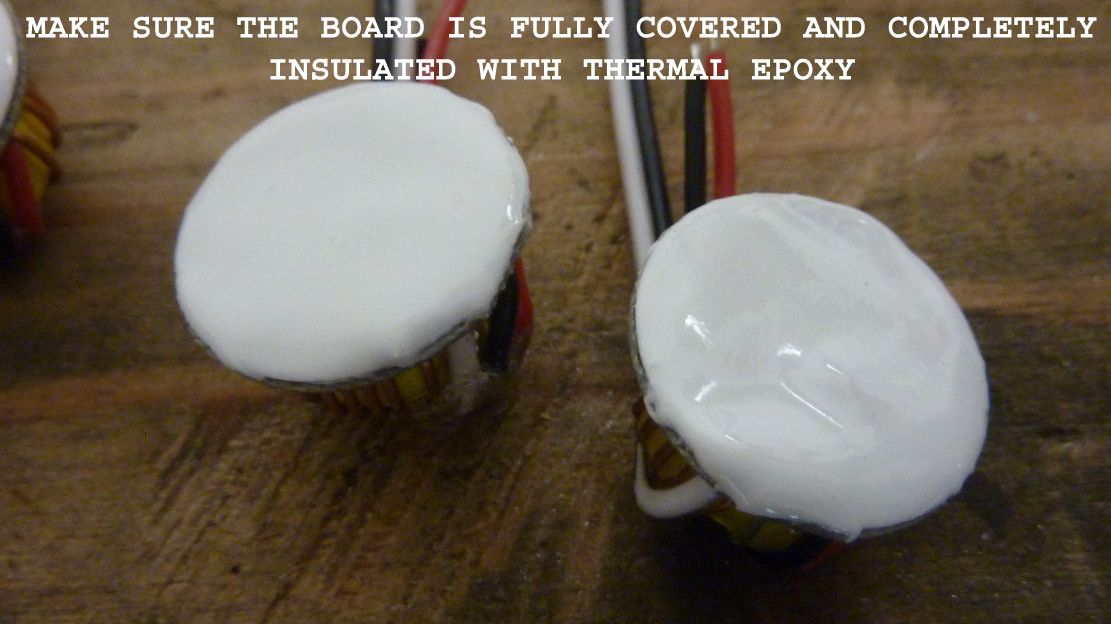
now comes insulating the back side of the board so you can attach it to aluminum without sending 12v power though it. honestly i dont know if this is really necessary or not but before i insulated it with the thermal epoxy i clear coated the bottoms with krylon fusion spray paint, just so that it would have more protection. you can chose whether to do this or not
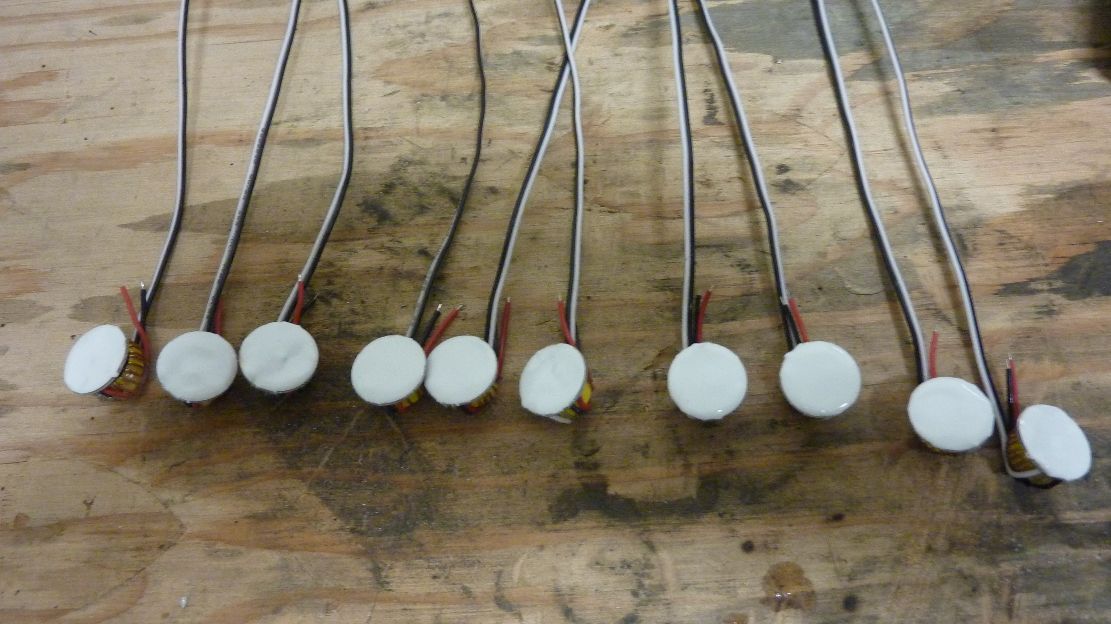
now comes the real insulating protection. make sure you put a good thick even coat of THERMAL EPOXY on the backsides of each driver, MAKE SURE none of the board or the solder spots are showing though the glue, them let them dry. usually firms up pretty good after 30 minutes.
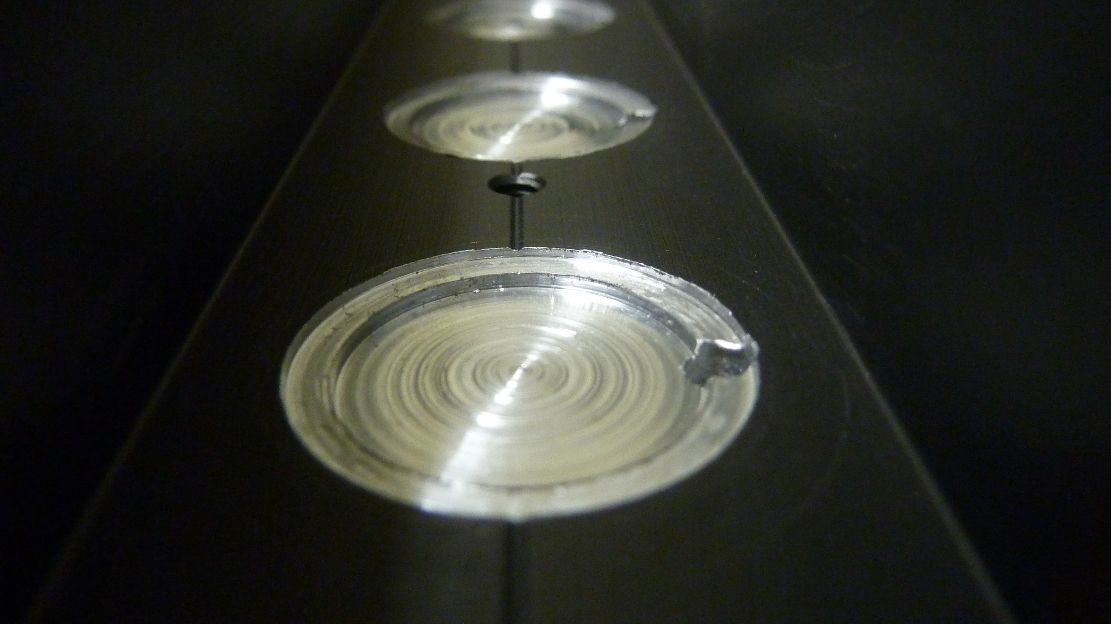
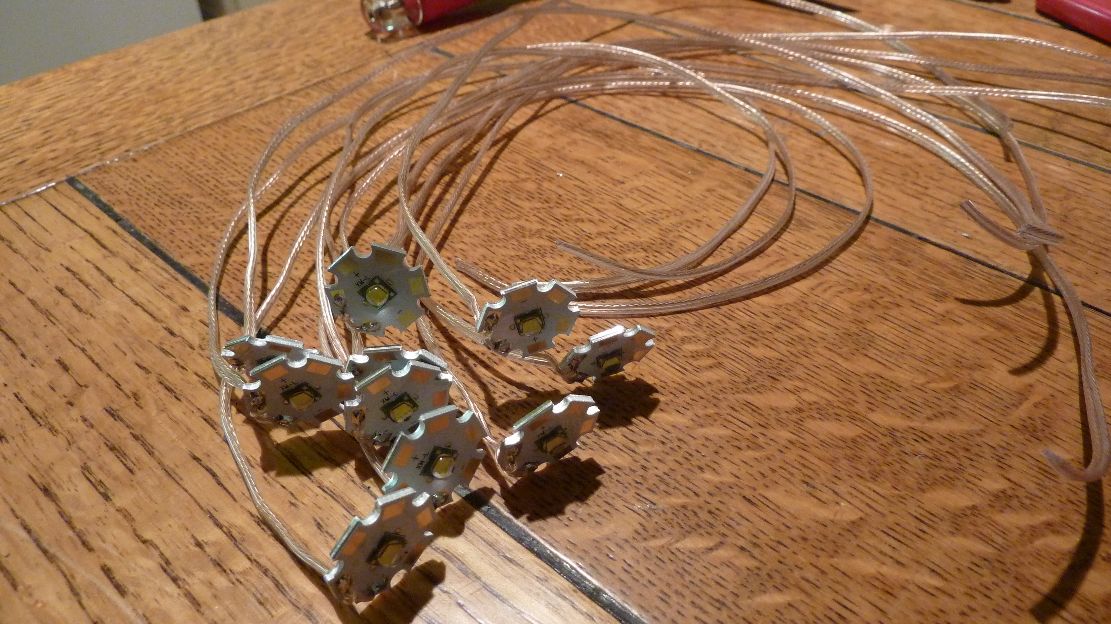
now set all that aside and bring out the leds. cut 5 pairs per bar of the BRAIDED 24g wire at about 14" long, they will get trimmed later. this is kinda tricky... BARELY strip these wires, im talking like just under an 1/8". it works better. solder them carefully and neatly to the led. dont take to long to do it or it will heat the led up real fast. also make sure the solder fully fused. and watch out for the silicone encase led diode. dont get the soldering gun to close to that. after they are done getting soldered carefully bend them through the top hole of the led like how i have it in the first picture. also TAKE NOTE TO HOW I WIRED IT TO THE LED. MAKE SURE YOUR POSITIVE IS ON POSITIVE AND NEGATIVE IS ON NEGATIVE. or say byebye! to your leds.
now slip the led wires into the holes on the housing. i usually only do 2 leds at a time, for this part you'll have to hold the led and lens housing firmly against the housing while the THERMAL EPOXY is setting up. you can usually let go in about 5 minutes. once you let go id wait another 15 till you tackle the next couple so the glue cant be disturbed from handling the other ones. this can get kinda messy so take your time. if your not confident just do one led/lens housing at a time. i was pretty thorough with the glue so the heat dispersion on the leds was good, also make sure you have a decent amount of glue on the 4 legs of the lens housing. wouldn't want your lens to fall off from vibrations later on.
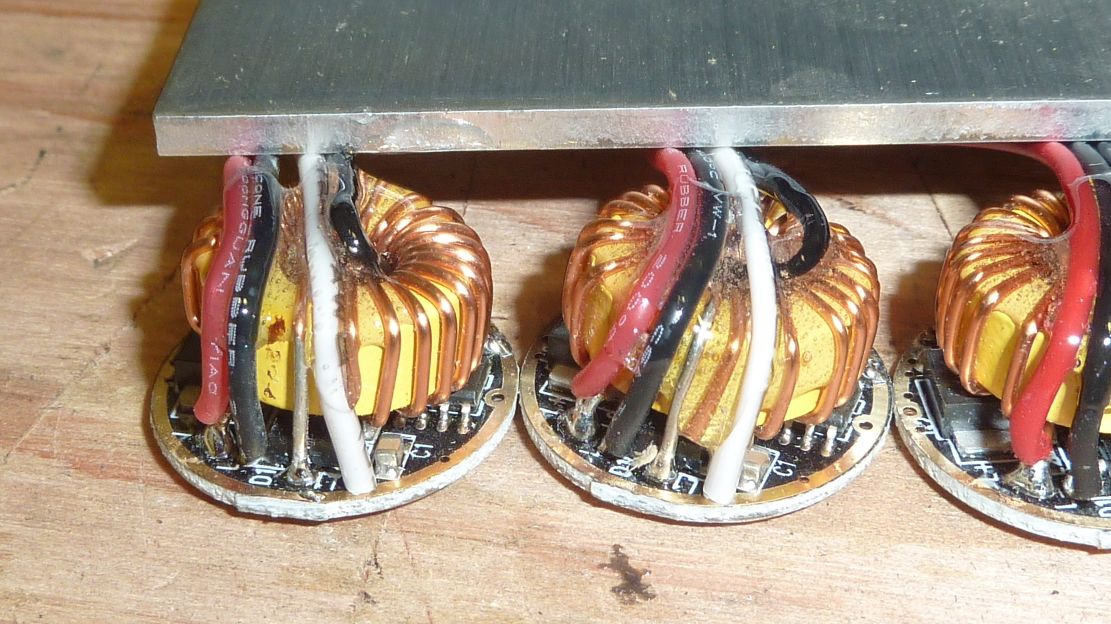
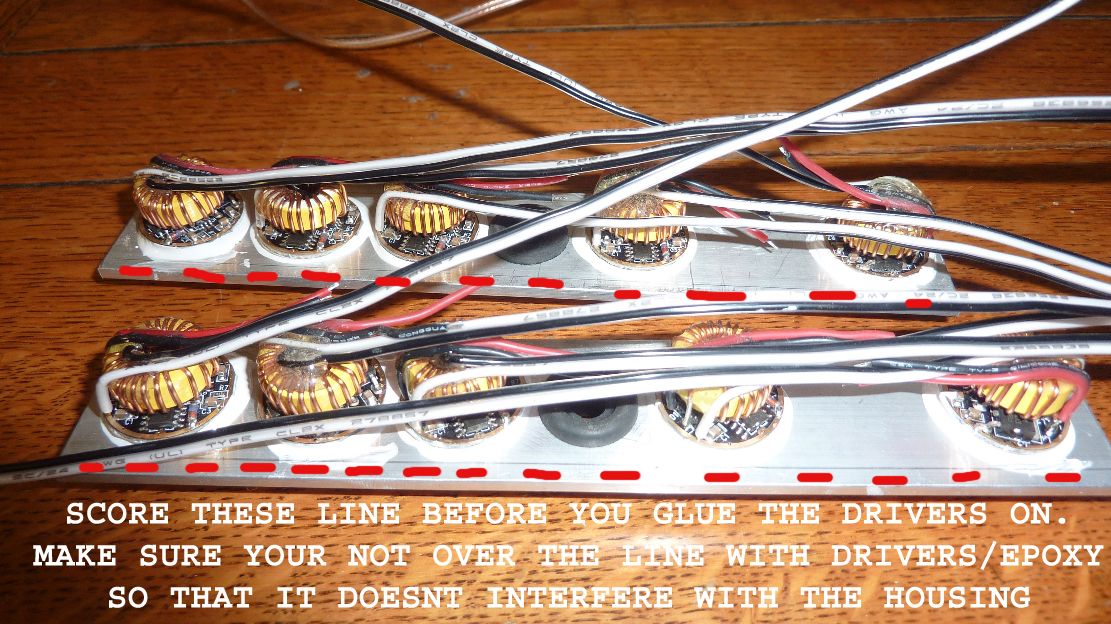
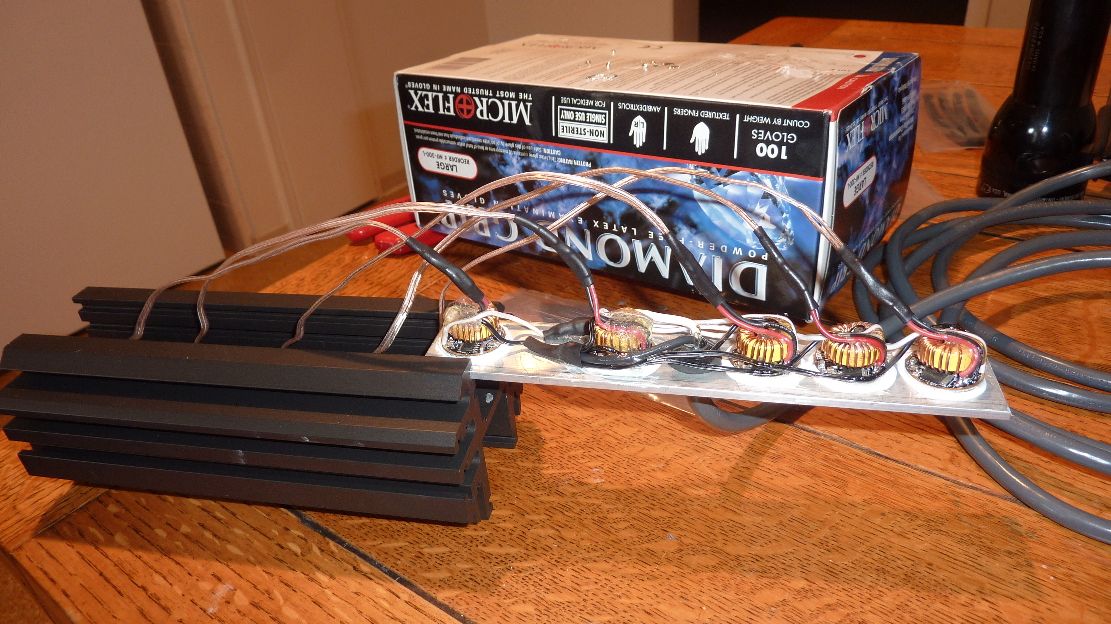
now comes gluing of the drivers to the aluminum back piece, visually space them how i have them. take note on the direction i have the wires running. they have to be like that for the next step. and make sure you score some side lines on the back piece while its slipped in the housing. you need to make sure you dont go over those line with the drivers and glue or else it wont slide in when your done. trust me its pretty tight. like the leds... just do a few at a time. you most likely will need to hold these also while they set.
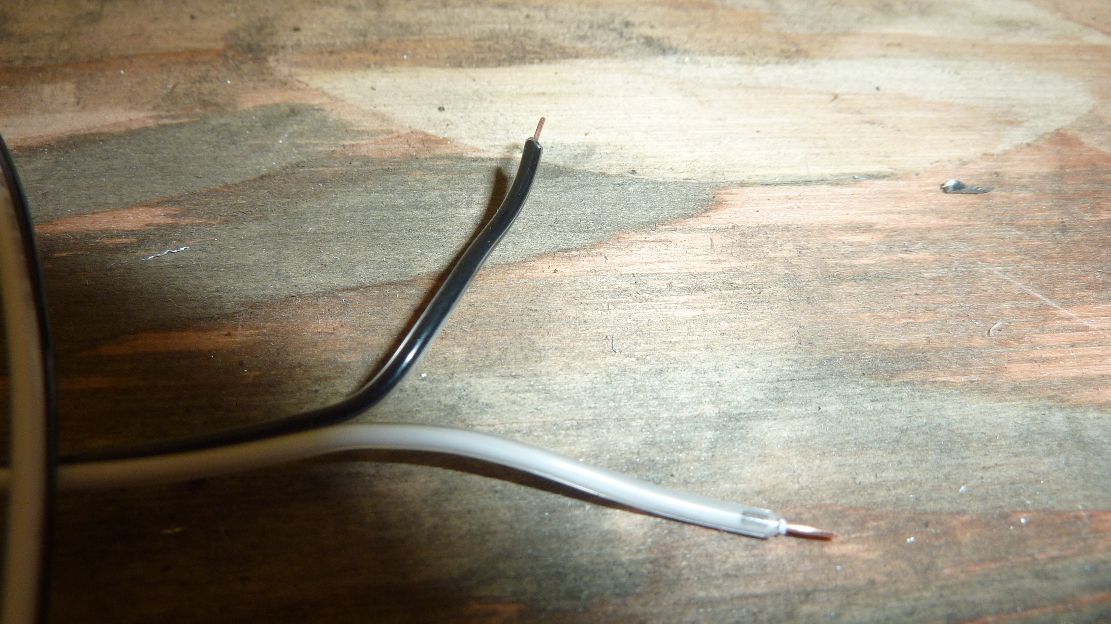
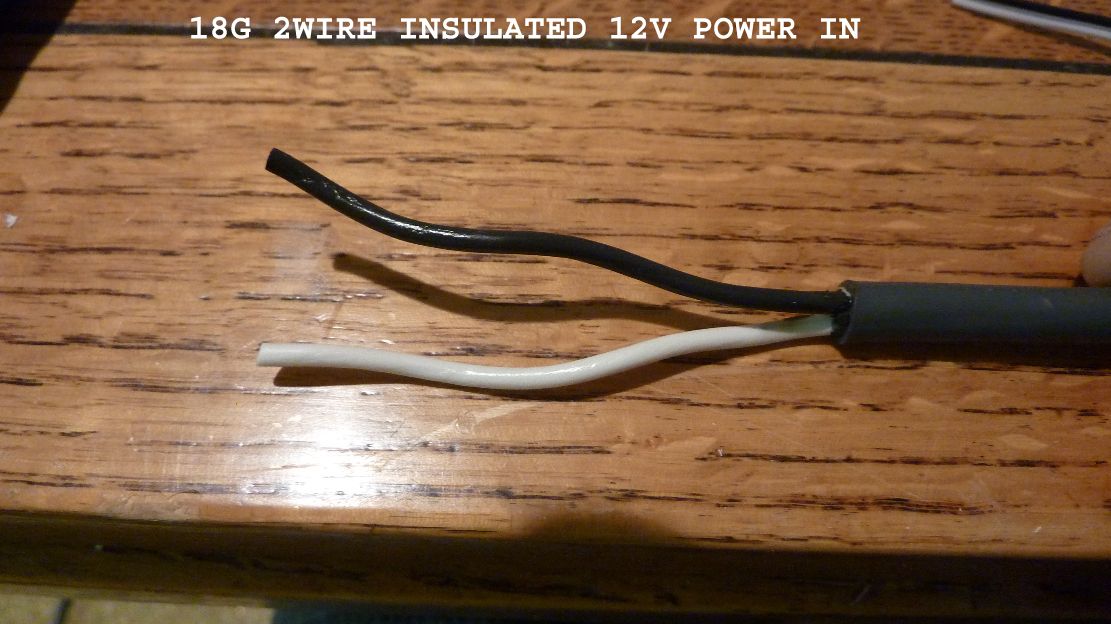
now the power cord. i used 2 wire 18gauge. cut it to what ever lenght you want. i kept mine at 10 ft for now untill i install them. strip off the cord insulation and clean it up so just the 2 wires are exposed. make the exposed wires about 3 inches long youll trim them later.
now push the cord into the rubber grommet. make sure its fully seated then glue it to the grommet with the standard clear 5 minute epoxy.
now this step.. kinda a pain.
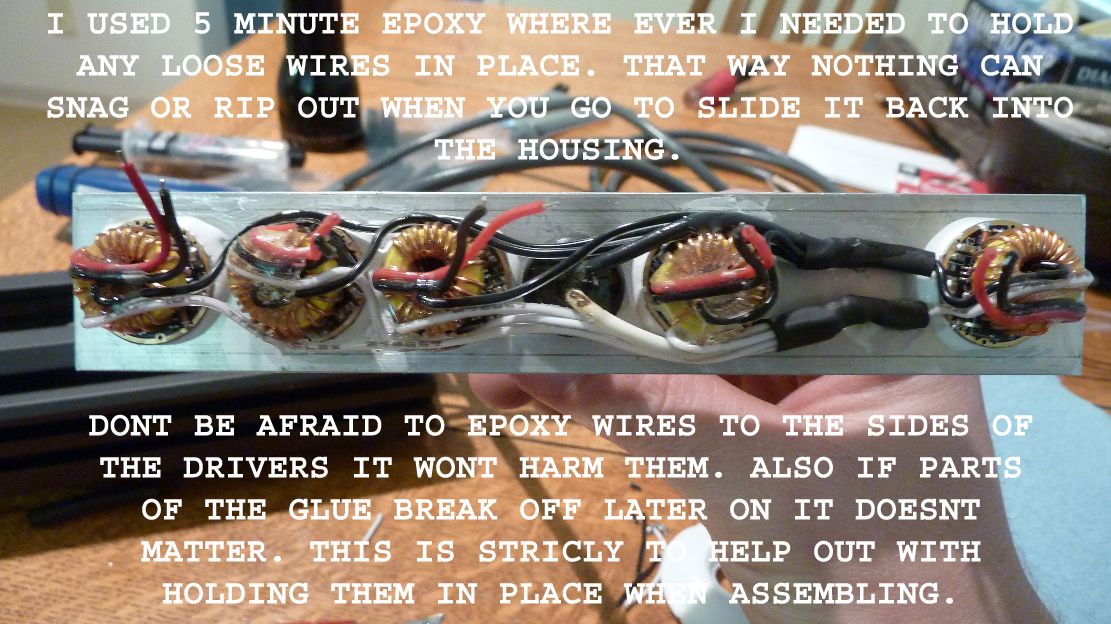
after the soldering and heat shinkings done move the wires around by hand. keep in mine they still have to clear the housing when the back piece in so don't go over your score lines. i just glued lots of spots so it would hold good. dont hesitate putting a little glue on the sides of the drivers. doesn't look good... but who cares its not gonna affect performance/quality.
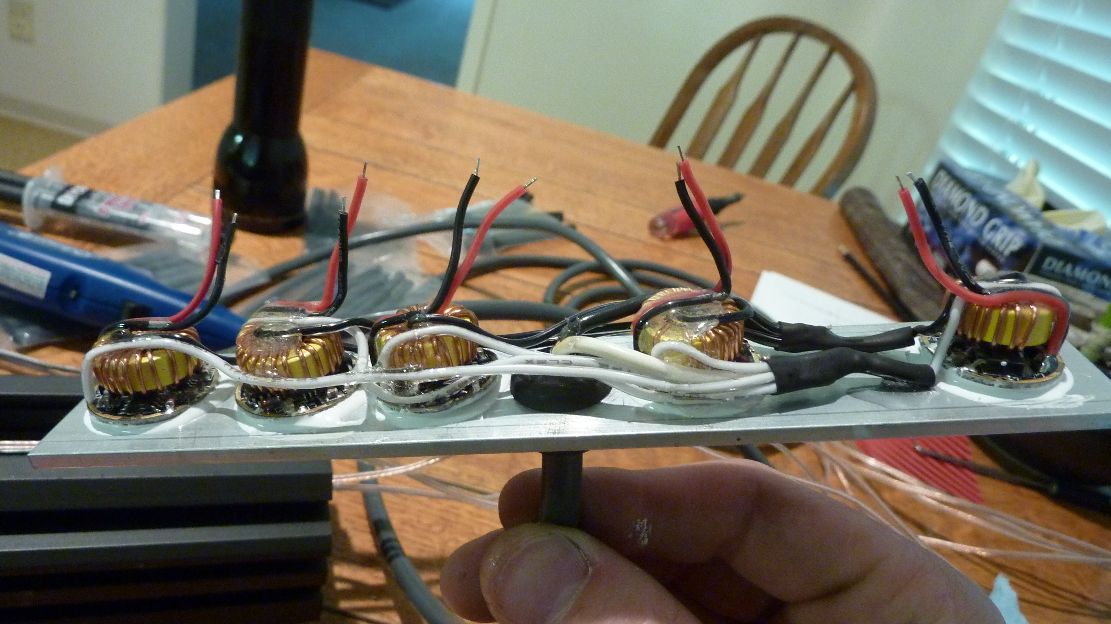
next step straighten the led wires so their ready for the next step.
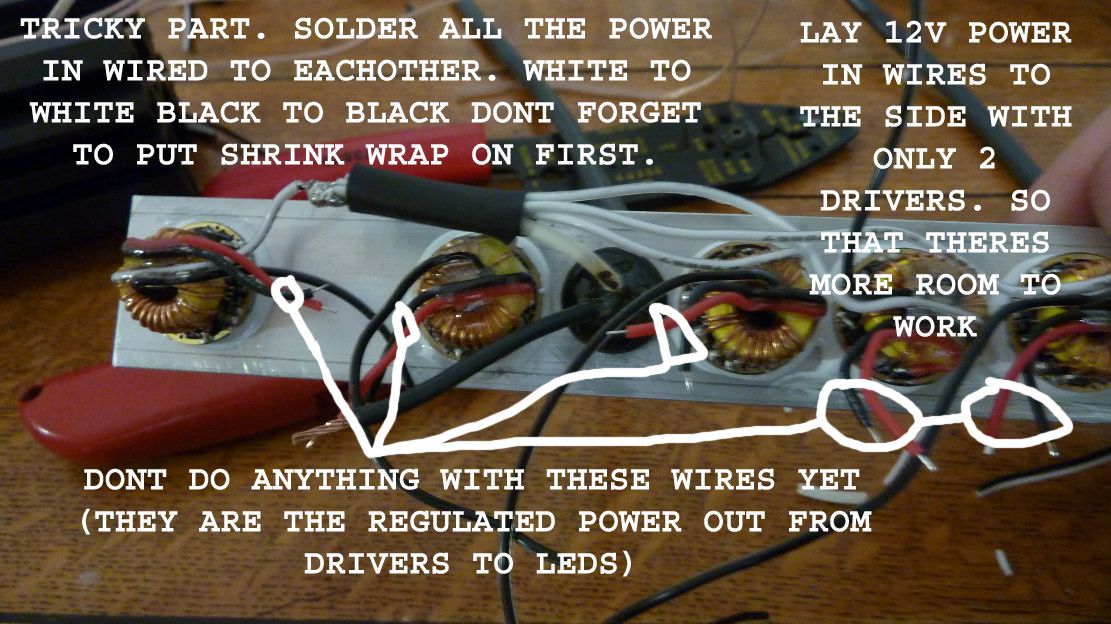
next step
now separate the wires, strip them, and get ready to solder. don't forget to slide on the shrink wrap before solder.
the first shrink wrap insulates the wires.. the second shrink wrap ties them back together so they are package inside better.
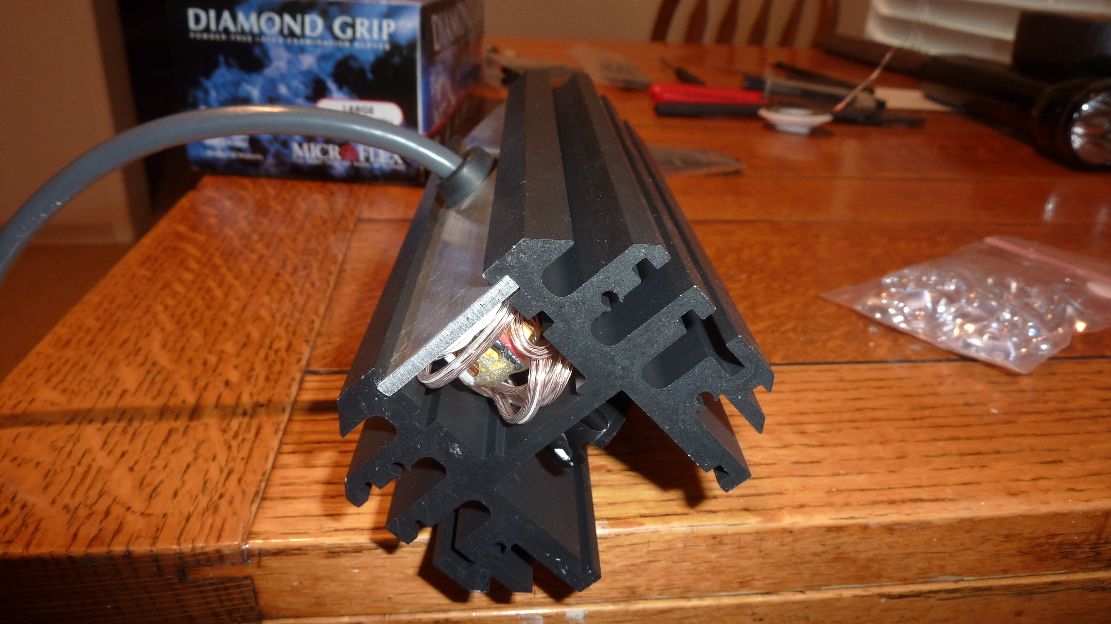
now slide the back piece in. be very gentle and careful there will be some resistance but if you feel like your ripping wires out you better slide it back out and work some stuff around. all 3 of mine went pretty smooth. some times you have to assist some wires gently with a pair on needle nose when your sliding the back piece on. At this point I would actually hook it up to a battery to make sure everything working right before you get any ferther. Make sure you temporarily hook it to a 15amp fuse with a switch. don?t just hold the wires on the battery by hand. IF YOU DON?T USE A SWITCH AND ARK THE WIRES BY HOLDING THE POWER WIRE ON THE BATTERY BY HAND, SOME OF THE DRIVERS CAN GET OFF SEQUENCE, MEANIING ONE WILL BE ON HIGH WHILE THE OTHER IS STROBING. IF YOU DID THIS AND THAT?S HAPPENING TO YOU JUST LEAVE IT UNHOOKED FOR 12 HOURS. THE DRIVERS WILL LOOSE MEMMORY AND ALL RESET TO HIGH MODE. THEN YOU SHOULD BE FINE TO TRY IT AGAIN (ask me how I know haha)
this is the the more spacious side of the setup. less wires since it was the leading edge when you slid the back piece on. this is the side you put the little silica pack in before you close up the end cap.
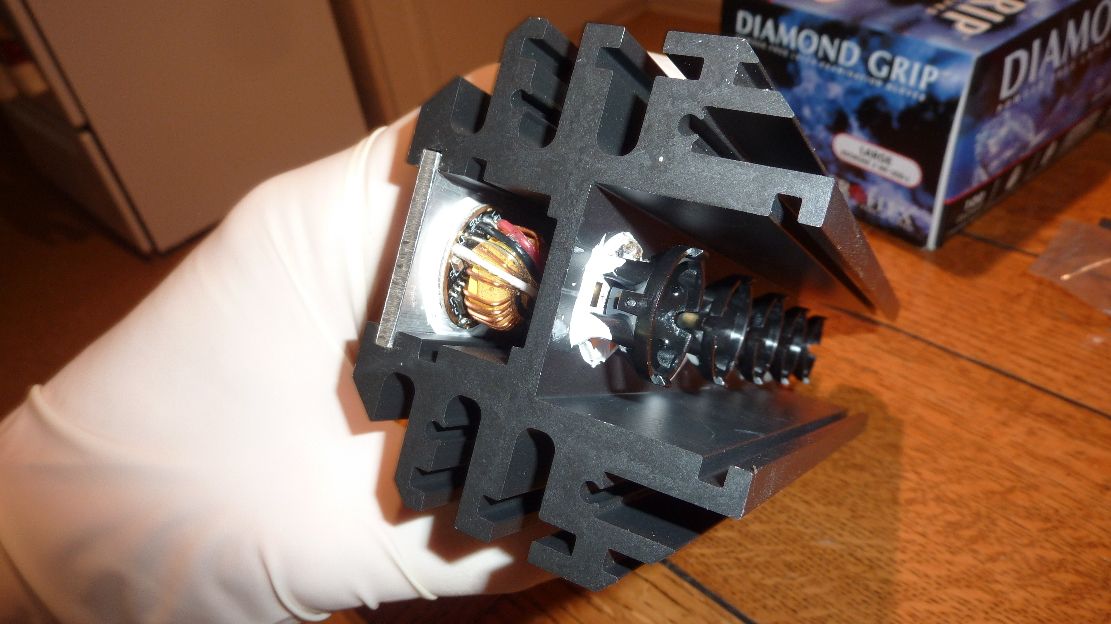
now clip the lenses in, they snap twice when their fully seated. just make sure there all the way clipped in. also wear clean gloves so you dont foul up the optics.
now slide the lexan in. make sure its EXACTLY the same width as the housing. dont want there to be a weather seal issue from it either being to long or to short. also make sure everything's really clean. if your careful you can use compressed air to lightly blow out any dust before you fully seal it up.
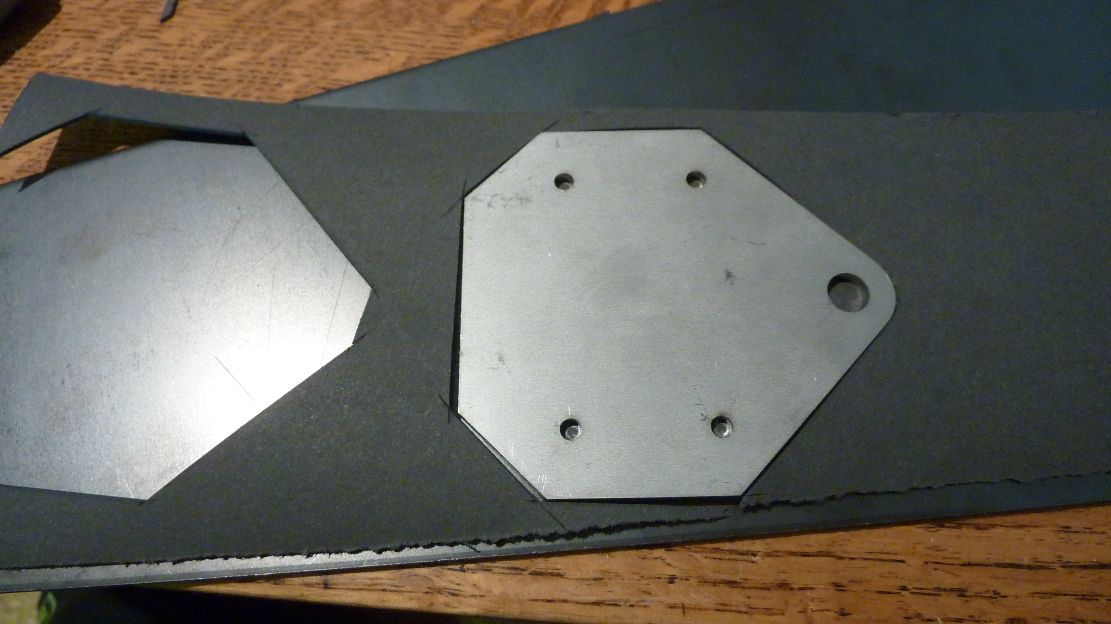
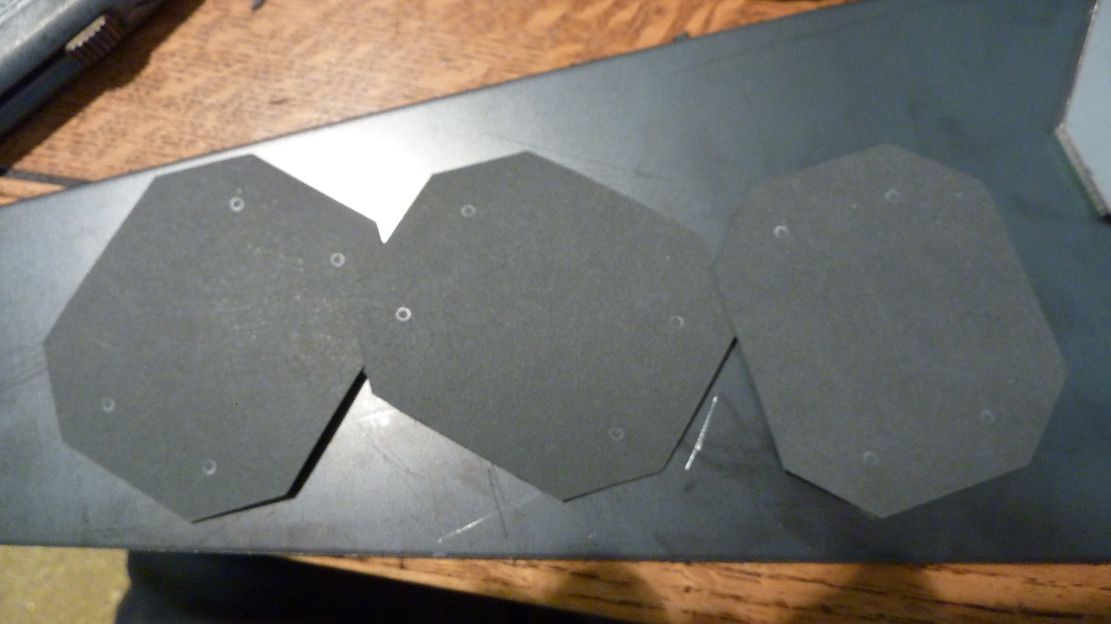
trace the end caps to cut out the gasket material. also mark the 4 screw holes. i used a small punch on some wood to knock out the holes cleanly.
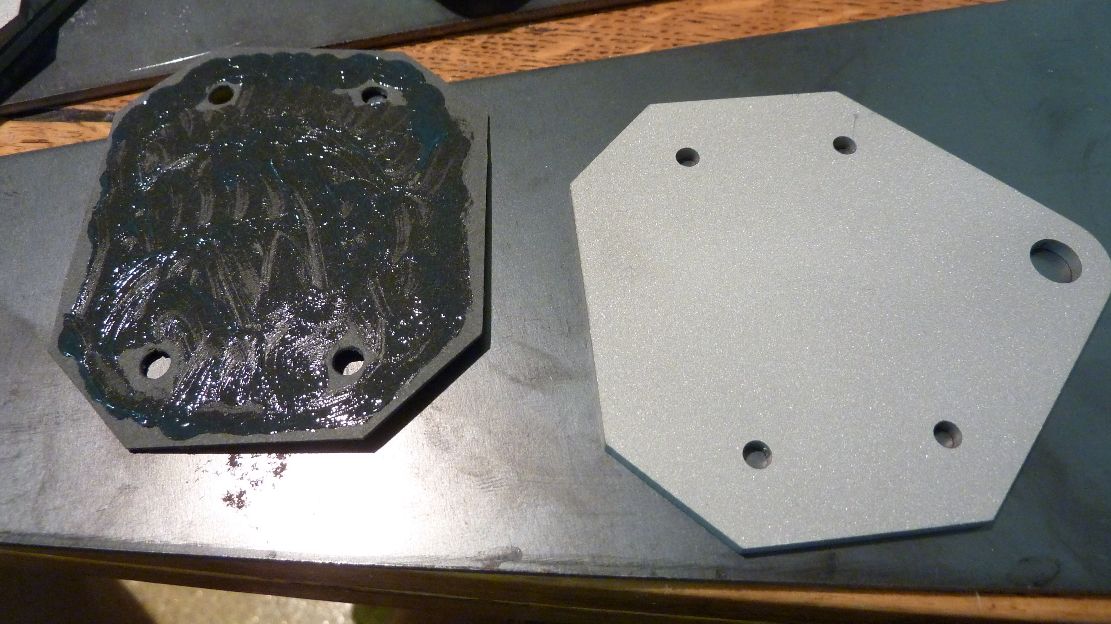
use some regular gasket maker for this. just for more protection and to hold the gasket in place for the next step. weight the gasket down with something flat while its drying so its perfectly flat
now with the FLOWABLE SILICONE, seal up the front glass and the back piece. only do the bottom front and bottom rear first.. let it dry for a few hours then flip the bar upside down and do the same thing on the top side of the bar. the reason for this is the flowable silicone will smooth itself out really well but can also make runs from the gravity pulling it. so the point it to not do it on the highest part, and possibly have it run down the glass. this stuff takes a full 24 hours to completely dry so dont mess with it. just let it do its thing. also dont use to much sealant of it will run like crazy (happened once to me). if you use the right amount you wont have a single run.
once all sides of the glass and back piece have COMPLETELY dried you can start the end caps. only do one side at a time. for the same reasons as it potentially making runs. do the end cap that has the least space first. goop it up covering the whole end of the cap, dont miss a single spot. wouldn't want water getting in there. put the cap on and screw the cap down. (you'll want to do all this fairly quick) tighten it snug but you dont need to wrench down on it. once thats all done flip the bar on its other side so its now sitting on the one you just completed. let it fully dry sitting like that. this way when it smooths itself gravity will pull it down against the cap. giving a good seal and clean look. once the one side has had at least 4 hours to partially firm up so the silicone stays you can start the other end cap. this is the side that should have room for a small silica pack. put it in there before closing the cap. this should help out with any moisture trapped in the air inside your light bar. shouldn't fog up this way. once your down with everything id give the whole bar a good 24 hours to make sure its all fully cured before mounting it or turning it on.
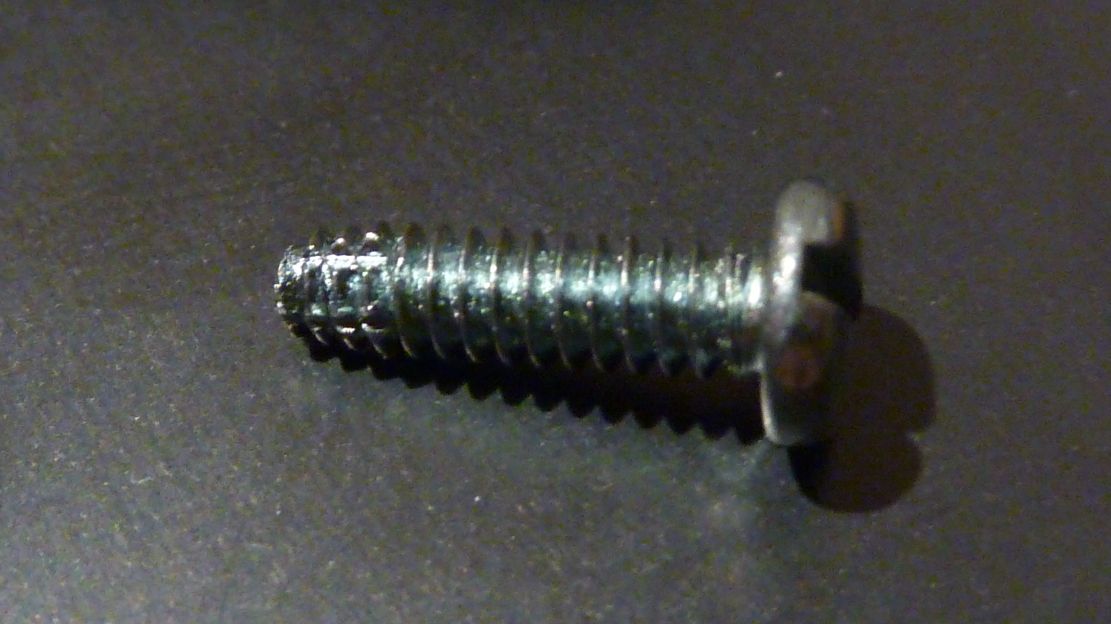
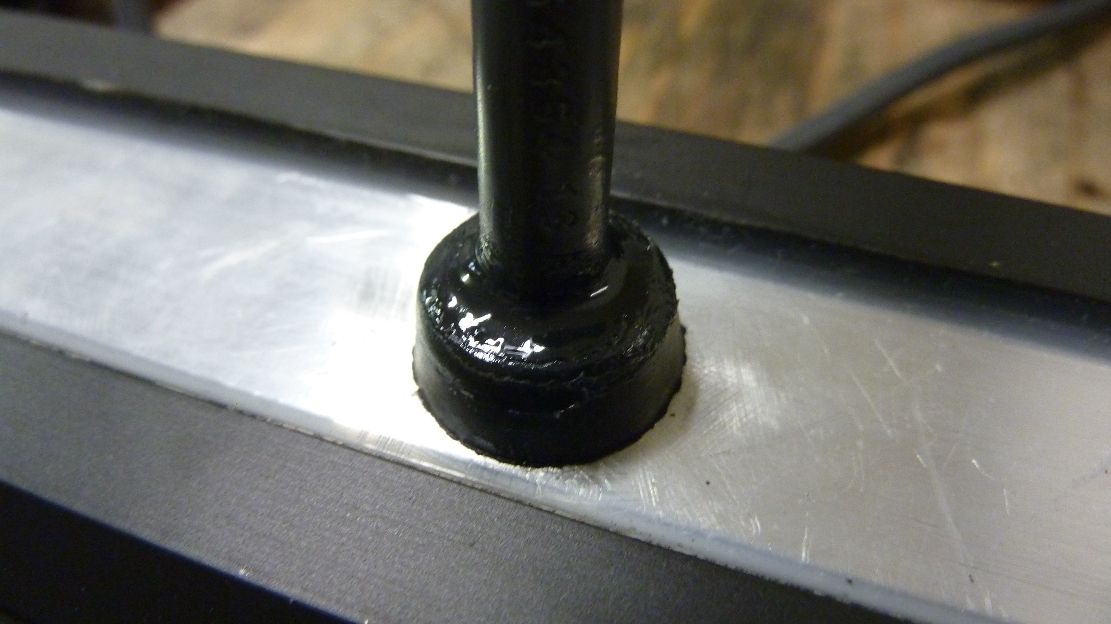
Heres a close-up on the screws, ill get the specs of the size later.. I cant remember it right now
and lastly i used a good shoe gue to seal the outside cord with the grommet. the shoe goes is about the best stuff out there since its so stick, stretchy. if you sourced a better grommet than what i used you would be better off and probably wouldn't need this step but mine isnt industrial enough to fully hold/seal the cord when you move the power cord around. after i did this everything was holding/sealed up great.
for those who try this i hope it all works out, hopefully now you have some bad ass leds that work great
Original post can be found here DIY Hight Powered LED Light Bar - Pirate4x4.Com : 4x4 and Off-Road Forum
saving this here for future use


 Email Blog Entry
